Blackberry Jam recipe: How 5 Tips Make It Perfect
Did you know that homemade jam can lose its fresh fruit flavor when it is cooked too long, even if the texture looks perfect? That is why making Blackberry Jam is not only about boiling berries and sugar together. The real secret is learning how to balance fruit, sweetness, acidity, heat, and timing.
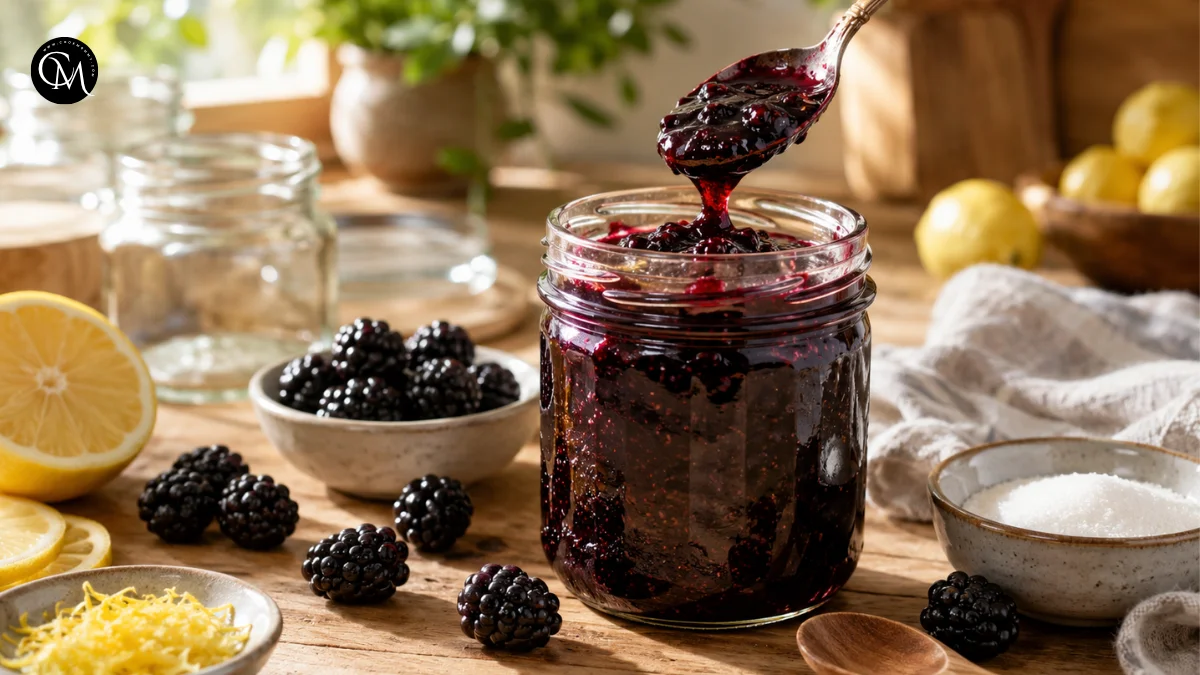
This Blackberry Jam recipe is worth keeping because it gives you a glossy, fruity spread with a rich berry taste and a soft, spoonable texture. It works beautifully on toast, biscuits, yogurt, pancakes, cakes, and even simple desserts. I like this recipe because it feels old-fashioned in the best way, but it does not require complicated equipment or advanced preserving skills.
With five practical tips, you will learn how to prepare the berries, build flavor, cook the jam correctly, test the texture, and finish it with confidence.
Table of Contents
Ingredients List
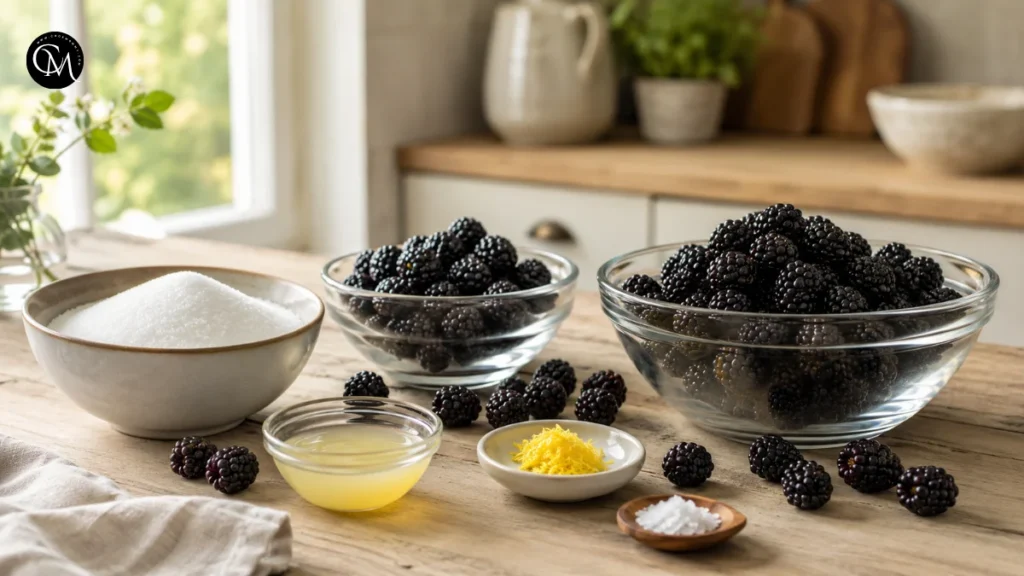
For a small homemade batch of Blackberry Jam, you only need a few simple ingredients. Because the recipe is so short, the quality of each ingredient matters.
| Ingredient | Amount | Notes and Substitutions |
|---|---|---|
| Fresh blackberries | 4 cups | Use ripe, sweet berries. Frozen blackberries also work if thawed and drained. |
| Granulated sugar | 2 cups | Adjust slightly depending on berry sweetness. Cane sugar can be used too. |
| Lemon juice | 2 tablespoons | Fresh lemon juice gives brightness and helps balance sweetness. |
| Lemon zest | 1 teaspoon | Optional, but it adds a fresh citrus aroma. |
| Pinch of salt | Small pinch | Helps make the berry flavor taste deeper. |
For a thicker Blackberry Jam, you can add 1 tablespoon of powdered pectin, but this recipe is designed to work without it if the jam is cooked carefully. If your berries are very tart, add 2 to 3 extra tablespoons of sugar. If they are very sweet, keep the lemon juice strong so the finished jam does not taste flat.
Choose blackberries that smell fruity and look dark, plump, and juicy. Avoid berries that are mushy, moldy, or watery because they can make the jam dull and loose.
Timing
| Task | Time |
|---|---|
| Preparation time | 10 minutes |
| Cooking time | 25–30 minutes |
| Total time | 35–40 minutes |
This Blackberry Jam is quicker than many traditional jam recipes because it is made in a small batch. Larger batches often take longer to thicken and can lose more fresh berry flavor during cooking. A smaller pot also gives you more control, especially if you are new to homemade jam.
Step-by-Step Instructions
Step 1 – Prepare ingredients
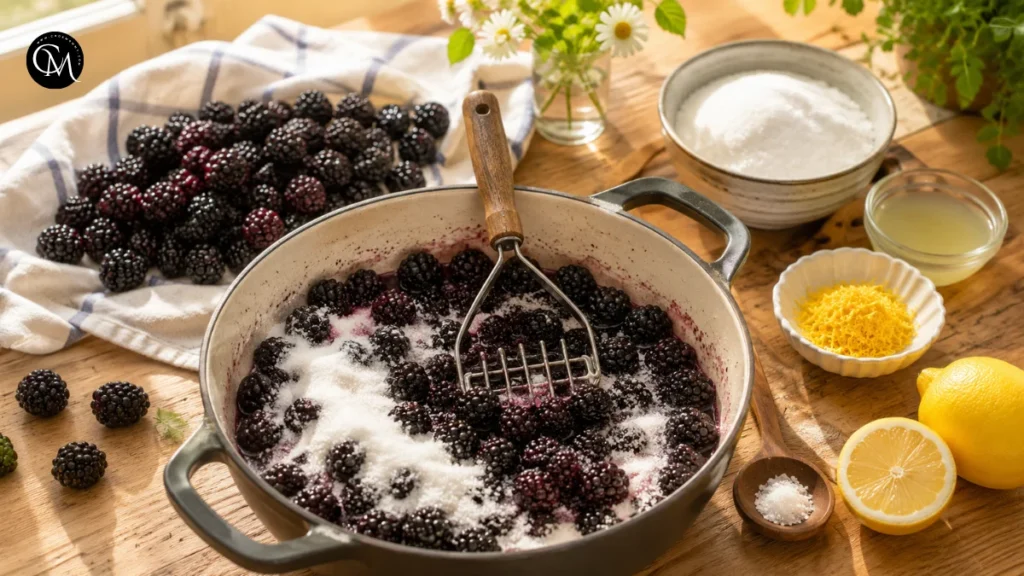
Start by rinsing the blackberries gently under cool water. Spread them on a clean towel and let them dry for a few minutes. This step may seem small, but extra water can thin the jam and make the cooking time longer.
Place the berries in a wide, heavy-bottomed saucepan. Add the sugar, lemon juice, lemon zest, and a small pinch of salt. Stir everything together and let the mixture sit for 10 minutes. This resting time helps the sugar pull juice from the berries, creating a natural syrup before the pan even reaches the stove.
For smoother Blackberry Jam, lightly mash the berries with a potato masher before cooking. For a more rustic texture, leave some berries partly whole. I prefer a mix because it gives the jam body while still keeping little pockets of fruit.
Step 2 – Build flavor base
Set the pan over medium heat and stir slowly as the sugar dissolves. At first, the mixture will look loose and juicy. That is normal. As the berries warm, they release more juice, and the sugar begins to blend with the fruit’s natural acidity.
This is where the flavor base forms. Sugar does more than sweeten the jam; it helps preserve the fruit flavor and gives the finished spread its glossy look. Lemon juice brightens the berries and supports the natural pectin already present in the fruit.
Let the mixture come to a gentle bubble, not a harsh boil. A controlled simmer protects the fresh berry taste and reduces the chance of scorching. Stir often with a wooden spoon or silicone spatula, especially around the edges of the pan where sugar can stick.
Step 3 – Cook the main ingredient
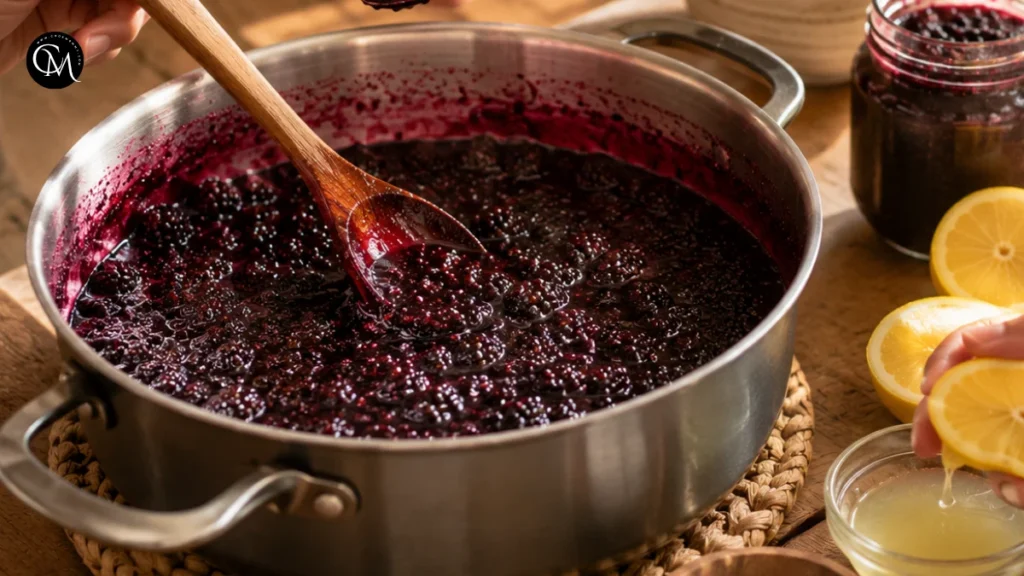
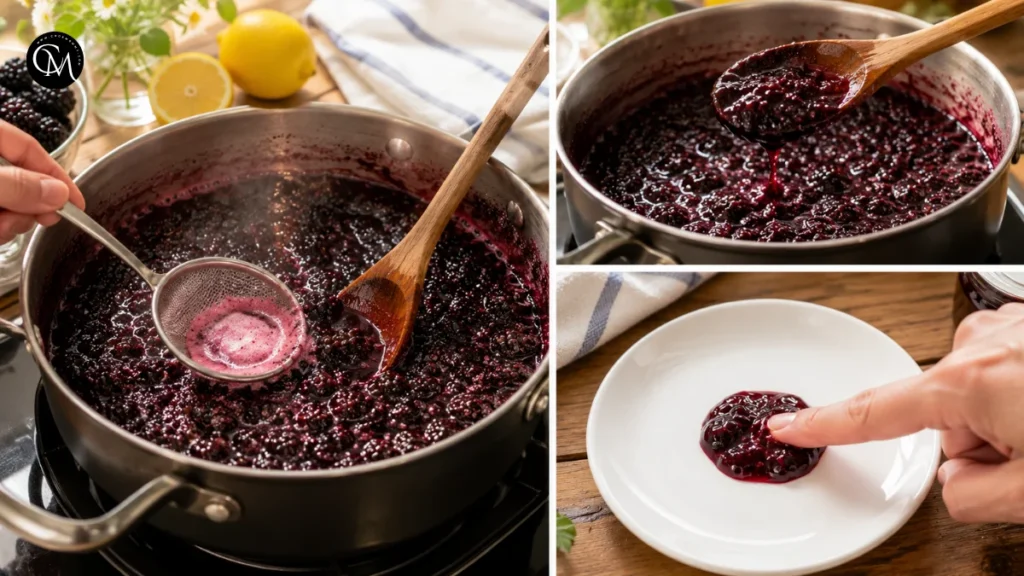
Once the mixture begins bubbling, increase the heat slightly and cook for 20 to 25 minutes. Stir regularly and skim off any pale foam that rises to the top. Foam is not dangerous, but removing it gives the Blackberry Jam a cleaner, shinier finish.
As the jam cooks, the bubbles will change. At first, they will look thin and watery. Later, they become slower, thicker, and glossier. This is a useful visual clue. The jam should coat the back of a spoon and drip slowly instead of running like juice.
For texture, avoid over-mashing once the jam starts thickening. If you keep crushing the fruit too much, the mixture can become heavy and muddy. Let some of the berries break down naturally while the rest create a pleasant homemade texture.
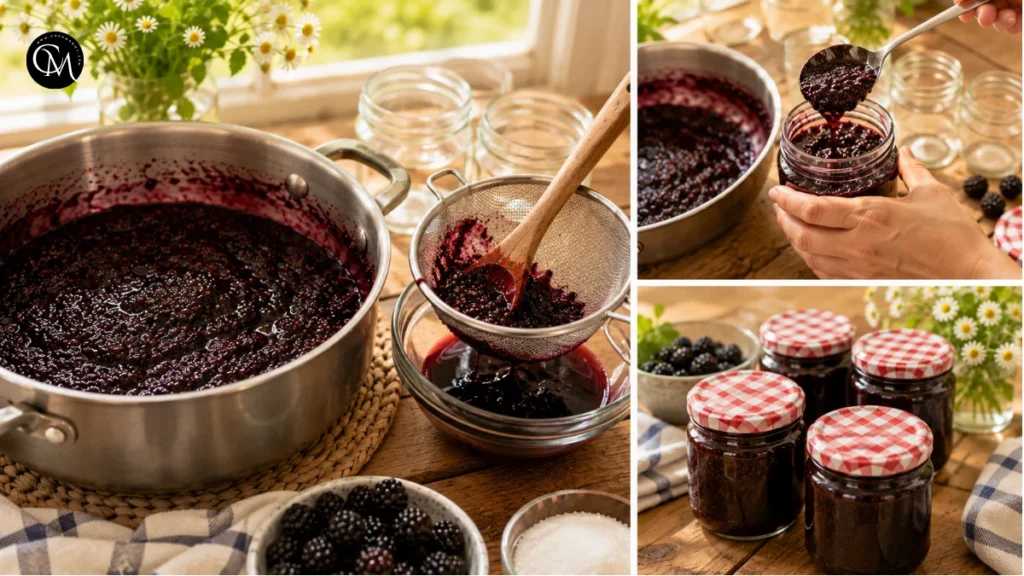
To test the set, place a small plate in the freezer before you begin cooking. Drop a spoonful of jam onto the cold plate and wait 30 seconds. Push it gently with your finger. If it wrinkles slightly or holds its shape, it is ready.
Step 4 – Combine everything
When the Blackberry Jam reaches the texture you like, lower the heat and stir well from the bottom of the pan. This final mixing helps combine the thicker fruit solids with the syrupy liquid so the jam feels balanced in every spoonful.
Taste carefully after cooling a small amount on a spoon. Hot jam can taste sweeter than it will once cooled, so do not rush major adjustments. If the flavor feels too sweet, add a small squeeze of lemon juice. If it tastes too sharp, add 1 or 2 teaspoons of sugar and simmer briefly to dissolve it.
Balance is what makes this recipe special. Good jam should taste like ripe berries first, with sweetness and acidity working in the background. The goal is not just thick jam; the goal is Blackberry Jam that tastes fresh, bright, and naturally fruity.
Step 5 – Finish & adjust seasoning
Remove the pan from the heat and let the jam rest for 5 minutes. Stir once more to even out the texture. If you want a smoother jam, press part of the mixture through a fine mesh sieve, then stir it back into the pan. This reduces seeds without removing all the character.
Chef-style advice: finish with patience. Jam thickens more as it cools, so stop cooking when it is slightly looser than your final goal. Overcooking can make it sticky, overly sweet, or too firm.
Spoon the warm Blackberry Jam into clean jars. Let it cool at room temperature, then cover and refrigerate. For long-term shelf storage, use proper canning methods with sterilized jars and safe processing guidelines.
Nutritional Information
Approximate values per 1 tablespoon serving:
| Nutrient | Amount |
|---|---|
| Calories | 45 |
| Carbohydrates | 12 g |
| Sugar | 10 g |
| Fiber | 1 g |
| Protein | 0 g |
| Fat | 0 g |
| Sodium | 1 mg |
These values are estimates and can change depending on the sweetness of the berries and the amount of sugar used. Blackberry Jam is naturally fruit-based, but it is still a sweet spread, so a small spoonful usually gives plenty of flavor.
Healthier Alternatives
- If you want a lighter Blackberry Jam, reduce the sugar by ¼ cup and cook the mixture a little longer. Keep in mind that sugar affects both sweetness and texture, so very low-sugar versions may be softer unless you use low-sugar pectin.
- For a whole-grain pairing, serve the jam with whole-wheat toast, oat pancakes, bran muffins, or seeded crackers. These options add more texture and make the sweet berry flavor feel more balanced.
- This recipe is naturally dairy-free and gluten-free, as long as you serve it with suitable bread, biscuits, or desserts. For children, spread a thin layer over toast or swirl it into plain yogurt. For seniors, a smoother strained version can be easier to enjoy. For dieters, use a teaspoon as a flavor booster rather than a heavy topping.
- You can also add chia seeds for a thicker, more modern fruit spread. Stir in 1 tablespoon after cooking, let the mixture rest, and refrigerate until thickened. The texture will be different from classic Blackberry Jam, but it is still delicious.
Serving Suggestions
- Serve Blackberry Jam on warm buttered toast for a simple breakfast that tastes homemade and comforting. It is also lovely with scones, English muffins, waffles, pancakes, and French toast.
- For desserts, spoon it over vanilla cheesecake, pound cake, rice pudding, or plain Greek yogurt. A small swirl can make a simple bowl of oatmeal feel special. You can also use it as a filling for thumbprint cookies, layer cakes, sandwich cookies, or homemade pastry.
- For a savory twist, pair Blackberry Jam with soft cheese, goat cheese, brie, or a mild cheddar on a snack board. The sweet-tart fruit flavor works surprisingly well with salty and creamy ingredients.
- My favorite quick serving idea is spreading it over toast with a little cream cheese. It tastes like a mini berry cheesecake for breakfast without any extra work.
Common Mistakes to Avoid
- Cooking on heat that is too high A hard boil can scorch the sugar and make the jam taste cooked instead of fresh. Keep the heat controlled and stir often.
- Skipping lemon juice Lemon juice is not only for flavor. It helps balance sweetness and supports a better set.
- Using wet berries Too much water makes the jam thinner and increases cooking time. Dry the berries after rinsing.
- Overcooking the jam Jam continues to thicken as it cools. If it looks perfect in the pan, it may become too firm later.
- Making a huge batch the first time Small batches are easier to control. They cook faster and keep more fresh berry flavor.
- Not testing the texture The cold plate test is simple and useful. It prevents guessing and helps you stop cooking at the right moment.
Storing Tips for the Recipe
- Store fresh Blackberry Jam in clean glass jars in the refrigerator for up to 2 weeks. Always use a clean spoon when serving to keep the jam fresh longer. If you want to keep it for several months, use a safe water-bath canning method and properly sterilized jars.
- For freezer storage, let the jam cool completely, then spoon it into freezer-safe containers, leaving a little space at the top for expansion. Freeze for up to 3 months. Thaw overnight in the refrigerator before using.
- You can also prep the berries ahead of time. Wash, dry, and freeze them on a tray, then transfer them to a freezer bag. This makes it easy to prepare Blackberry Jam when fresh berries are not in season.
- This recipe became one of my regular homemade staples because it turns a small basket of berries into something useful for breakfasts, desserts, and quick snacks all week.
Conclusion
Blackberry Jam is one of those simple recipes that proves homemade food does not need to be complicated to feel special. With ripe berries, the right amount of sugar, fresh lemon juice, and careful cooking, you get a glossy, fruity spread that tastes brighter than most store-bought jars. The five tips in this recipe help you avoid runny texture, dull flavor, and overcooking, while keeping the process friendly for beginners.
Try this Blackberry Jam the next time you have fresh or frozen berries at home. If you make it, leave a comment or review with how you served it. Subscribe for more practical homemade recipes, kitchen tips, and simple ideas that make everyday meals taste better.
FAQs
Can I make Blackberry Jam with frozen blackberries?
Yes. Thaw the berries first and drain extra liquid. Frozen berries work well, though the jam may need a few extra minutes to thicken.
Do I need pectin for this recipe?
No. This Blackberry Jam can set naturally with sugar, lemon juice, and proper cooking. Pectin is optional if you want a firmer texture.
Why is my jam too runny?
It may need more cooking time, more acidity, or a better texture test. Use the cold plate test before removing it from the heat.
Can I reduce the sugar?
Yes, but the jam may be softer. For a lower-sugar version, consider using low-sugar pectin to help the texture set properly.
How do I remove blackberry seeds?
Press the cooked jam through a fine mesh sieve, then stir some pulp back in if you want a thicker, fruitier texture.
How long does homemade jam last?
Refrigerated jam lasts about 2 weeks. Properly canned Blackberry Jam can last longer when processed and stored safely.
What can I serve with this jam?
Serve it with toast, biscuits, pancakes, yogurt, cheesecake, oatmeal, or soft cheese. It works for both sweet breakfasts and snack boards.
Tried it before ?
There are no reviews yet. Be the first one to write one.