Healthy Twix Bars: 6 Secrets for Homemade Caramel
Can a homemade candy bar really taste rich and satisfying while using simpler ingredients than a packaged treat? Yes, and that is exactly why Healthy Twix Bars are such a smart dessert to make at home. You get the familiar crunch of a cookie base, the soft chew of caramel, and the smooth finish of chocolate, but with ingredients you can actually recognize.
This recipe is worth making because it feels like a treat without being complicated. Instead of traditional caramel made with heavy cream and refined sugar, these Healthy Twix Bars use dates, nut butter, maple syrup, and dark chocolate for a naturally sweet, chewy texture. They are great for meal prep, lunchbox treats, after-dinner cravings, or a weekend dessert that feels special without much effort.
Table of Contents
Ingredients List
For the shortbread-style base:
- 1 cup almond flour
- ½ cup oat flour
- 3 tablespoons melted coconut oil
- 2 tablespoons maple syrup
- 1 teaspoon vanilla extract
- ¼ teaspoon sea salt
For the homemade caramel:
- ¾ cup soft Medjool dates, pitted
- ¼ cup creamy almond butter, peanut butter, or cashew butter
- 2 tablespoons maple syrup
- 2 tablespoons warm water, plus more if needed
- 1 teaspoon vanilla extract
- ¼ teaspoon sea salt
For the chocolate topping:
- 1 cup dark chocolate chips or chopped dark chocolate
- 1 teaspoon coconut oil
- Flaky sea salt, optional
For substitutions, use peanut butter if you like a bold, nutty flavor. Cashew butter makes the caramel smoother and milder. Sunflower seed butter works well for nut-free Healthy Twix Bars. For a gluten-free version, choose certified gluten-free oat flour. For dairy-free bars, use dairy-free dark chocolate.
Timing
- Preparation time: 20 minutes
- Baking time: 10–12 minutes
- Chilling time: 1 hour
- Total time: About 1 hour 30 minutes
Classic caramel candy can take longer and often needs a thermometer. These Healthy Twix Bars are easier because the caramel is blended, not boiled. That means less stress, fewer tools, and a much more beginner-friendly dessert.
Step-by-Step Instructions
Step 1 – Prepare ingredients
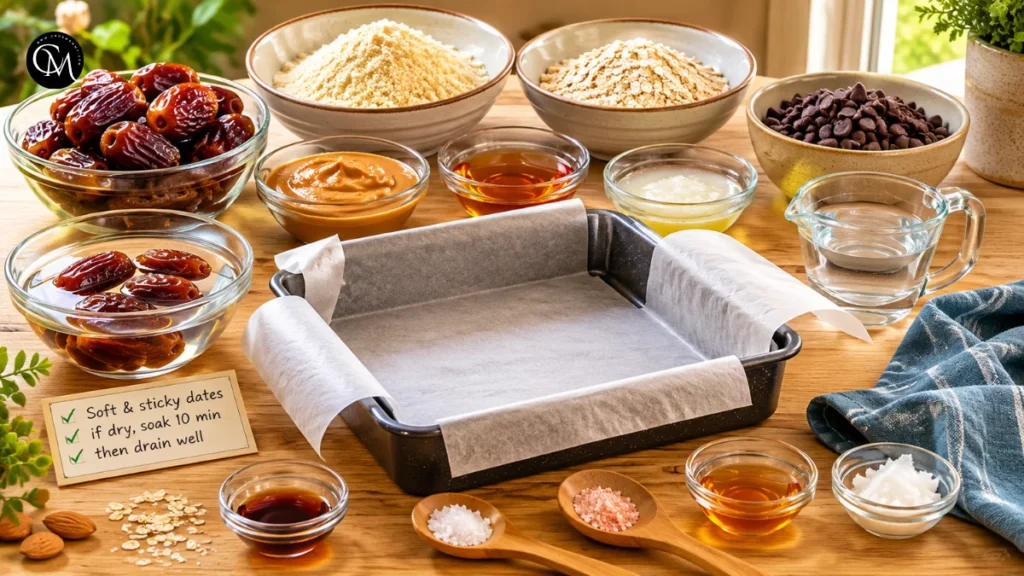
Start by lining an 8-inch square pan with parchment paper. Leave some extra parchment hanging over the sides so you can lift the bars out easily later. Measure all your ingredients before starting, especially the caramel ingredients.
Good preparation matters because layered desserts depend on texture. The base needs to cool before the caramel goes on, and the caramel needs to firm up before the chocolate layer is added. A few minutes of planning makes your Healthy Twix Bars cleaner, neater, and easier to slice.
Check the dates before blending. They should feel soft and sticky. If they are dry, soak them in warm water for 10 minutes, then drain them well.
Step 2 – Build flavor base
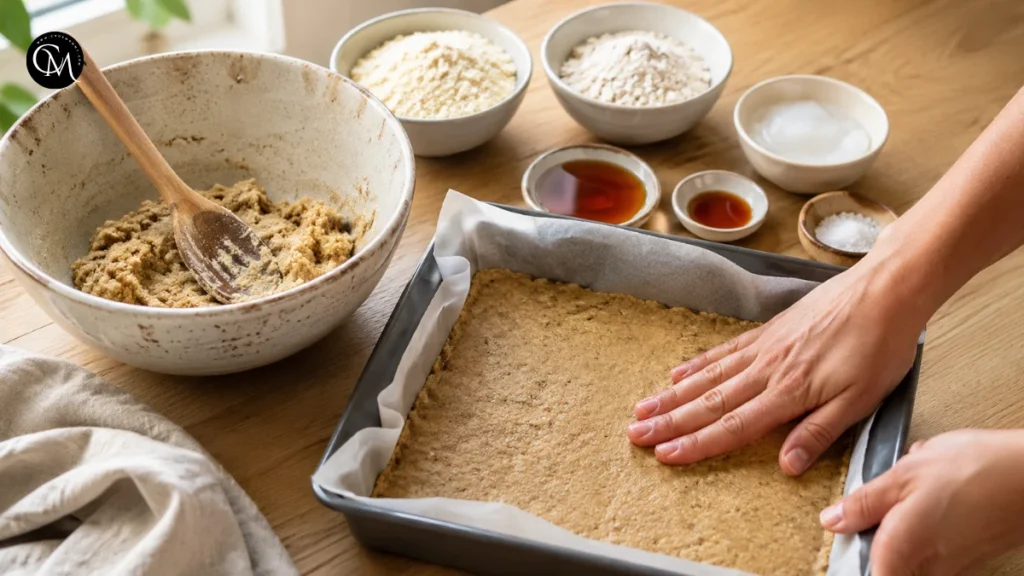
In a mixing bowl, combine almond flour, oat flour, melted coconut oil, maple syrup, vanilla extract, and sea salt. Stir until the mixture looks like soft cookie dough. Press it firmly into the prepared pan, making the layer even from corner to corner.
This base gives Healthy Twix Bars their shortbread-style texture. Almond flour adds richness, oat flour gives structure, and coconut oil helps hold everything together. The small pinch of salt balances the sweetness and makes the chocolate taste deeper.
Bake the base at 350°F, or 175°C, for 10–12 minutes, until the edges look lightly golden. Let it cool completely before adding caramel.
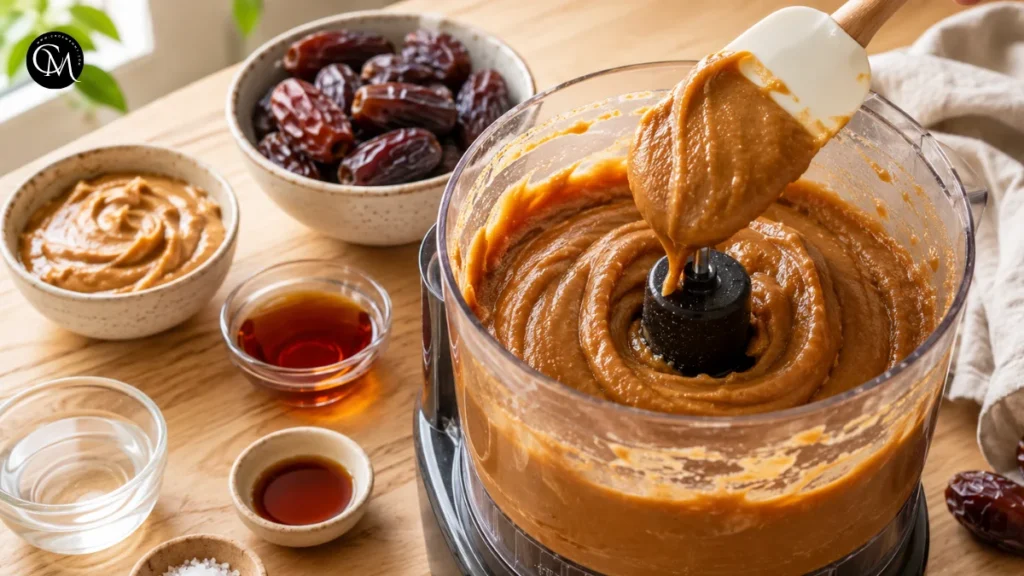
Step 3 – Cook the main ingredient
For this recipe, the main ingredient is the homemade caramel. Add the dates, nut butter, maple syrup, warm water, vanilla, and salt to a food processor. Blend until the mixture becomes thick, glossy, and smooth.
The caramel should be spreadable but not runny. If it is too thick, add warm water one teaspoon at a time. If it gets too loose, blend in one or two extra dates.
This caramel works because dates bring natural sweetness and chewiness, while nut butter adds body and richness. Together, they create the soft center that makes Healthy Twix Bars taste indulgent without using traditional boiled caramel.
Step 4 – Combine everything
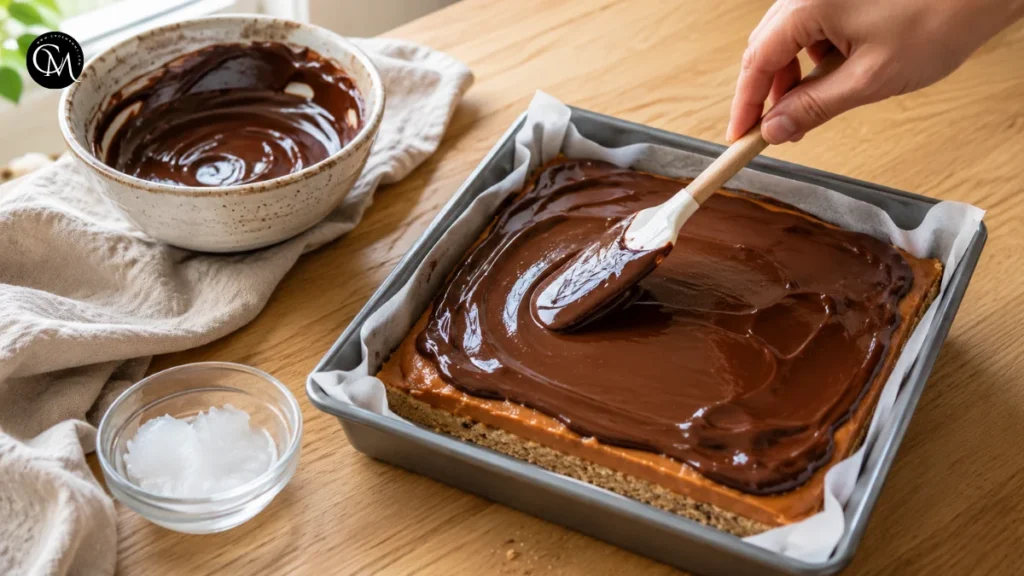
Spread the caramel evenly over the cooled base. Use a spatula or the back of a spoon to push it into the corners. Place the pan in the freezer for 20–30 minutes so the caramel firms up.
Melt the dark chocolate with coconut oil in short microwave bursts, stirring every 20–30 seconds. You can also melt it gently over a double boiler. The coconut oil helps the chocolate spread smoothly and set with a softer bite.
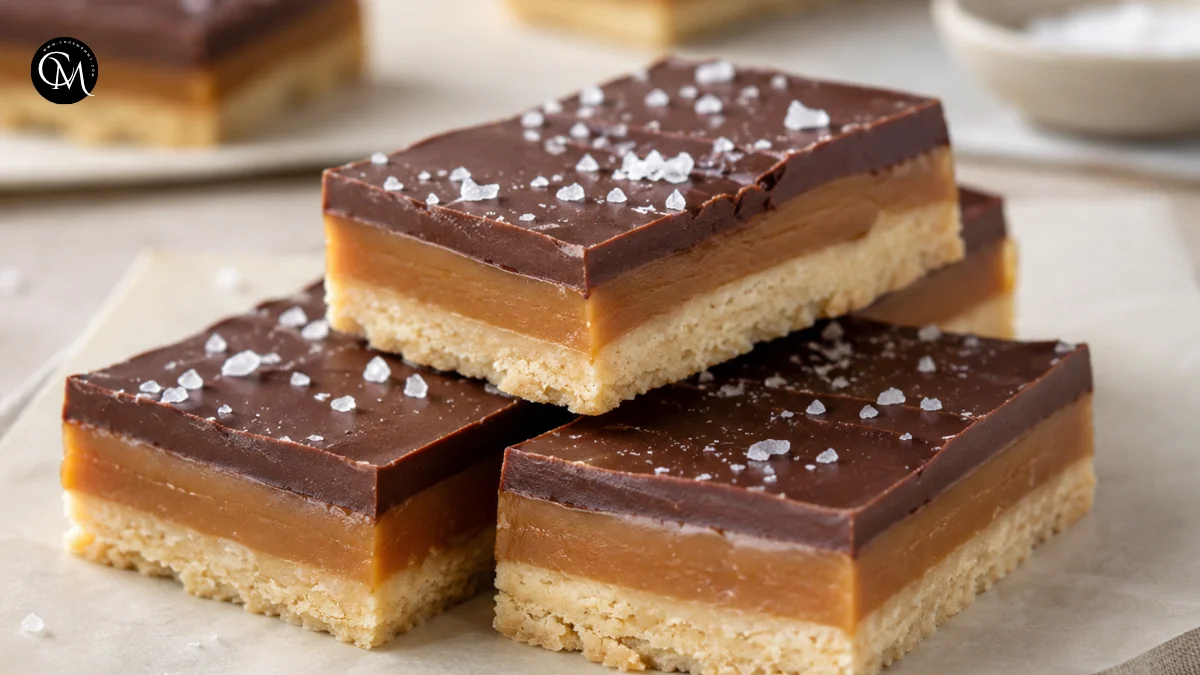
Pour the melted chocolate over the caramel layer and spread it evenly. At this point, the Healthy Twix Bars should show three beautiful layers: golden cookie base, creamy caramel center, and glossy chocolate top.
Step 5 – Finish & adjust seasoning
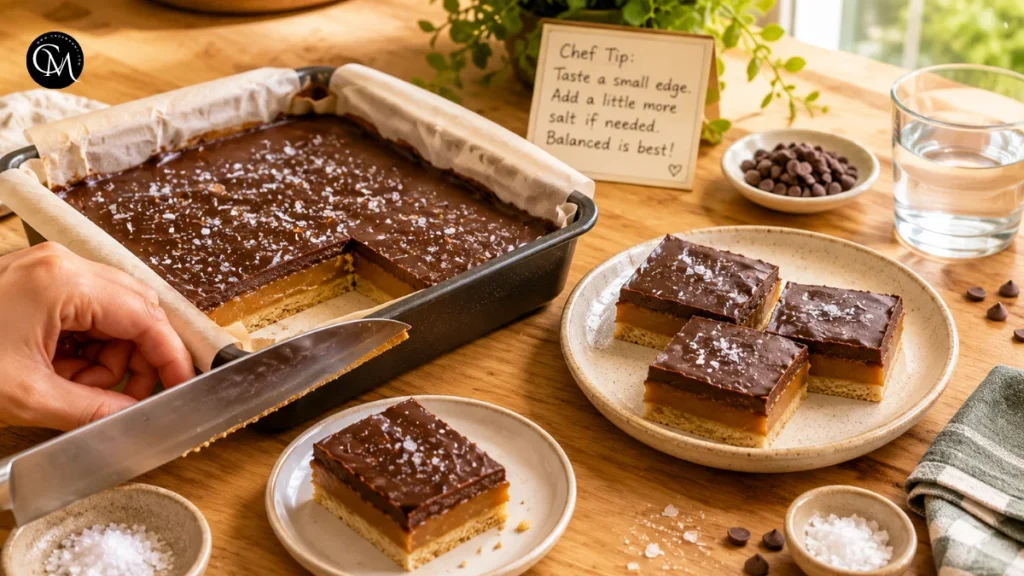
Before the chocolate sets, sprinkle a tiny pinch of flaky sea salt over the top if you enjoy sweet-salty desserts. Chill the pan for at least 30 minutes, or until firm.
For clean slices, warm a sharp knife under hot water, wipe it dry, and cut slowly. Do not press too hard, or the chocolate may crack. If the bars are very cold, let them sit at room temperature for 5 minutes first.
Chef-style advice: taste a small edge after chilling. If the caramel tastes flat, add a little more salt next time. The best Healthy Twix Bars should taste balanced, not overly sweet.
Nutritional Information
Approximate values per bar, based on 16 bars:
| Nutrient | Approximate Amount |
|---|---|
| Calories | 180–220 |
| Protein | 4–5 g |
| Carbohydrates | 18–23 g |
| Fat | 12–15 g |
| Fiber | 3–4 g |
| Sugar | 10–14 g |
These numbers can change depending on your chocolate, nut butter, and sweetener. Healthy Twix Bars are still a dessert, but they include more fiber and satisfying fats than many packaged candy bars. Enjoy them as a mindful sweet treat, not as a meal replacement.
Healthier Alternatives
- For lower-sugar Healthy Twix Bars, use very dark chocolate and reduce the maple syrup in the caramel. Dates already add natural sweetness, so you can adjust the syrup based on your taste.
- For a whole-grain option, use more oat flour in the base. Oat flour adds a slightly hearty flavor and pairs nicely with caramel and chocolate.
- For dairy-free bars, use dairy-free chocolate chips. For gluten-free bars, make sure the oat flour is certified gluten-free. For nut-free bars, use sunflower seed butter and replace almond flour with extra oat flour or a seed-based flour blend.
- For children, cut the bars into small squares so they feel fun and easy to eat. For dieters or portion-focused readers, freeze the bars individually and take out one piece when needed. For seniors, make the caramel slightly softer by adding one extra teaspoon of warm water while blending.
Serving Suggestions
Serve Healthy Twix Bars chilled for the cleanest layers and best texture. They pair beautifully with coffee, mint tea, or a cold glass of milk. For a dessert plate, serve them with sliced strawberries, banana coins, or a few toasted almonds.
For lunchboxes, pack them with an ice pack so the chocolate stays firm. For parties, cut them into small rectangles and drizzle extra melted chocolate on top. A light sprinkle of flaky salt gives them a bakery-style finish.
You can also chop one bar into small pieces and sprinkle it over Greek yogurt, chia pudding, or smoothie bowls. It adds caramel-chocolate flavor without needing a large portion.
Common Mistakes to Avoid
- Using dry dates Dry dates make the caramel grainy. Soak them first for smoother Healthy Twix Bars.
- Skipping the cooling step If the base is warm, the caramel can melt and become messy. Let the base cool completely.
- Adding too much water Add water slowly when blending caramel. Too much liquid makes the filling loose.
- Overheating the chocolate Chocolate burns easily. Melt it gently and stir often for a glossy finish.
- Cutting too soon The layers need time to set. Chilling helps the bars hold their shape.
- Making the base too thick Press the base evenly. A thick base can overpower the caramel and chocolate balance.
Storing Tips for the Recipe
Store Healthy Twix Bars in an airtight container in the refrigerator for up to 1 week. Place parchment paper between layers so they do not stick together.
For longer storage, freeze them for up to 2 months. I like freezing them in single portions because it makes dessert easier during busy weeks. Let frozen bars sit at room temperature for 5–8 minutes before eating so the caramel softens slightly.
This recipe became one of my regular meals because it gives me a homemade sweet option after lunch or dinner without needing to buy packaged candy. It keeps well, tastes satisfying, and feels easy enough to make again.
Conclusion
Healthy Twix Bars are a simple homemade dessert with a tender cookie base, chewy date caramel, and smooth chocolate topping. They taste rich and fun, but the ingredients are easy to understand and simple to adjust. You can make them gluten-free, dairy-free, nut-free, or lower in sugar while keeping the flavor balanced and enjoyable.
Try this recipe the next time you want a sweet snack with a homemade touch. Leave a comment or review with your favorite caramel variation, and subscribe for more easy dessert recipes, smart ingredient swaps, and practical kitchen tips.
FAQs
Can I make Healthy Twix Bars without dates?
Yes. You can use a thick caramel made with nut butter, maple syrup, coconut oil, and oat flour, but dates give the best chewy texture.
Do Healthy Twix Bars need to be baked?
Only the base is baked for 10–12 minutes. The caramel and chocolate layers are no-bake, which keeps the recipe simple.
Can I use peanut butter instead of almond butter?
Yes. Peanut butter gives a stronger flavor, almond butter tastes milder, and cashew butter creates the smoothest caramel texture.
How do I stop the chocolate from cracking?
Let the bars rest for a few minutes before slicing. Use a warm, dry knife and cut slowly for cleaner edges.
Are Healthy Twix Bars gluten-free?
They can be gluten-free if you use certified gluten-free oat flour and check all packaged ingredients, especially chocolate chips.
Can I freeze Healthy Twix Bars?
Yes. Freeze them in an airtight container for up to 2 months. Add parchment between layers and thaw briefly before eating.
Why is my caramel too sticky?
It may need more chilling time, or it may contain too much liquid. Add water slowly and chill the bars longer before slicing.
Tried it before ?
There are no reviews yet. Be the first one to write one.