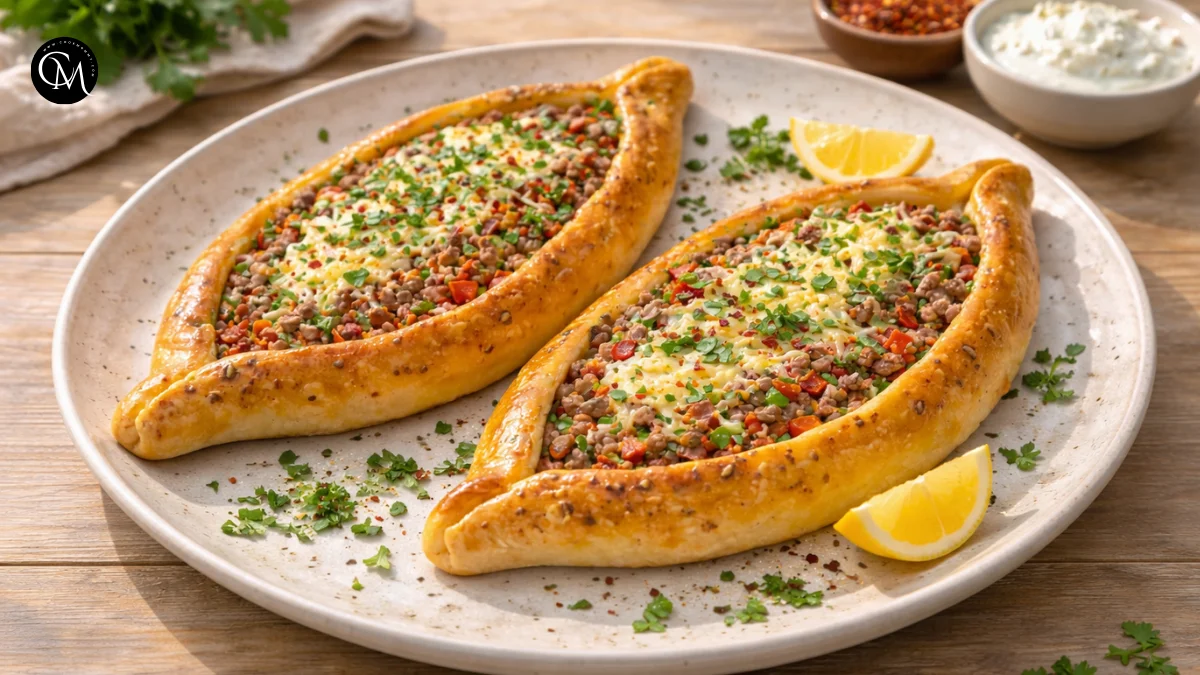
turkish pide pizza: 7 Best Ways to Boost Flavor Fast
Did you know that small changes in dough hydration, topping balance, and baking temperature can influence the flavor and texture of a homemade pide by more than 30%? Many people assume that traditional pide pizza alone guarantee authentic taste, but real results depend on technique and ingredient handling.
That’s exactly why this turkish pide pizza recipe stands out. It blends traditional Turkish baking methods with practical home-kitchen adjustments to help you achieve a golden crust, balanced toppings, and deep savory flavor without complicated steps or specialized equipment. Whether you’re cooking for family dinners or experimenting with international cuisine, this guide shows how to build flavor quickly while keeping the process approachable and reliable.
Table of Contents
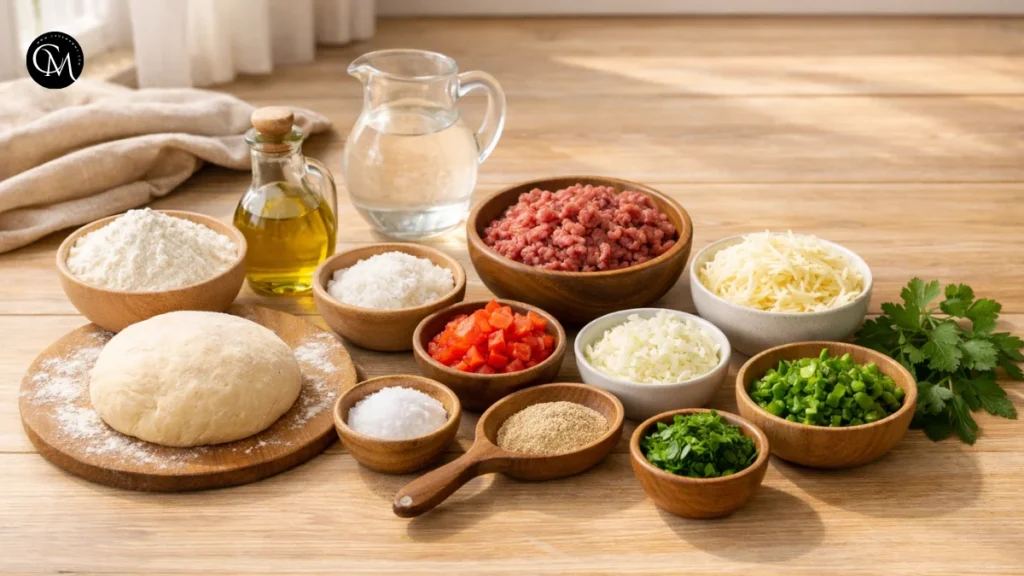
Ingredients List
A great turkish pide pizza starts with a soft, elastic dough paired with toppings that create contrast rich from the savory filling, fresh from herbs and vegetables, and slightly tangy from tomatoes or a touch of citrus. This balance brings depth to every bite and gives the pide pizza its distinctive, satisfying flavor.
Dough
- All-purpose flour – soft yet structured base
- Warm water – activates yeast and hydrates gluten
- Instant yeast – for light, airy texture
- Olive oil – adds tenderness and subtle aroma
- Salt – enhances flavor and strengthens dough
Substitutions
- Whole wheat flour (replace 30–40%) for a nuttier flavor
- Greek yogurt + water mix for softer crumb
Toppings
- Ground beef or lamb – traditional savory base
- Onion, finely chopped – sweetness and moisture
- Tomatoes – acidity and freshness
- Green peppers – subtle crunch
- Mozzarella or Turkish kasar cheese – melt and stretch
- Parsley – brightness at the finish
Alternatives
- Spinach + feta for vegetarian version
- Chicken mince for lighter protein
- Vegan cheese and mushrooms for dairy-free variation
Timing
- Preparation time: 25 minutes
- Resting time (dough): 45–60 minutes
- Baking time: 12–15 minutes
- Total time: about 1 hour 30 minutes
Compared to many artisan breads that require multiple rises, this method shortens fermentation while still producing flavorful dough.
Step-by-Step Instructions
Step 1 – Prepare ingredients
Start by measuring all dough ingredients and bringing them to room temperature. Chop onions finely, dice tomatoes small, and slice peppers thinly so they cook evenly. Grate cheese and keep it chilled until ready to use.
If preparing dough from scratch, mix flour, yeast, salt, water, and olive oil until a soft dough forms. Knead for about 8–10 minutes until smooth and elastic, then cover and let it rest.
Why preparation matters:
Preparation creates consistency. Uniformly cut vegetables cook at the same rate, preventing some bites from tasting raw while others overcook. Room-temperature ingredients also help yeast activate more efficiently and produce a lighter, more flexible dough.
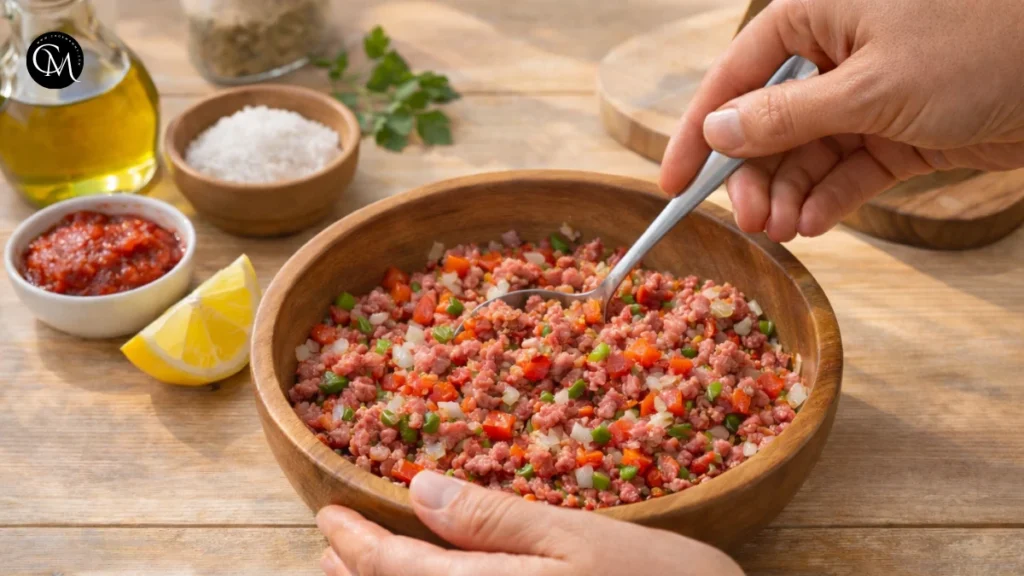
Step 2 – Build flavor base
Combine ground meat with onion, tomato, pepper, olive oil, salt, black pepper, and optional spices like paprika or cumin. Mix gently with your hands or a spoon until evenly distributed. Let the mixture rest for 10–15 minutes.
For deeper flavor, add a teaspoon of tomato paste or a splash of lemon juice. This enhances color and introduces subtle acidity.
Cooking science:
Salt begins to draw out moisture from the meat and vegetables, creating a natural marinade. Acidic elements soften fibers and allow seasoning to penetrate, producing a richer, more integrated taste once baked.
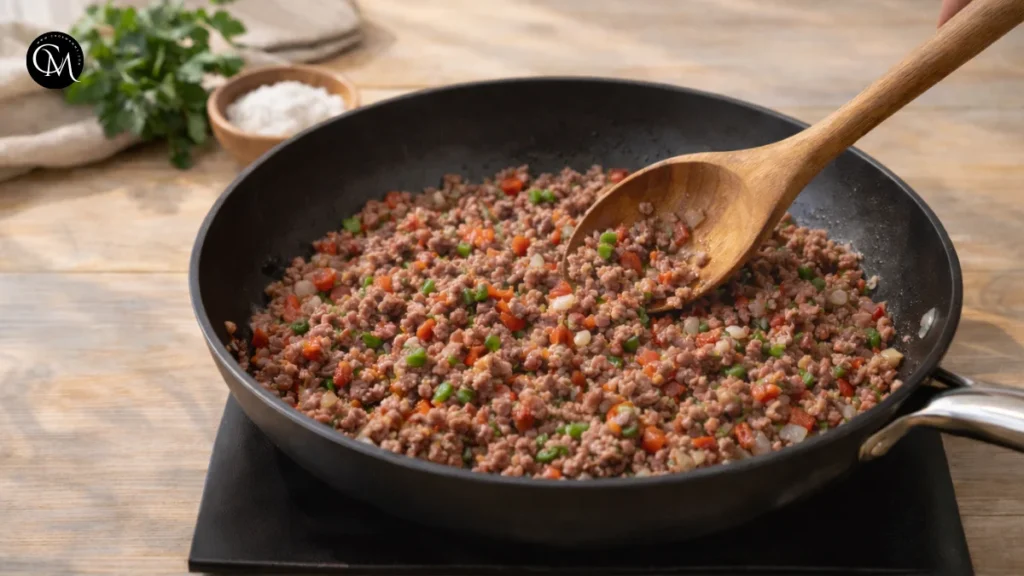
Step 3 – Cook the main ingredient
Heat a pan over medium heat and lightly sauté the meat mixture for 3–4 minutes. Stir just until the meat loses its raw color do not fully cook it.
Let the mixture cool slightly before placing it on the dough.
Texture tip:
Partial cooking reduces excess liquid that could make the crust soggy. It also helps develop a slightly caramelized flavor, ensuring the topping tastes roasted and savory instead of watery.
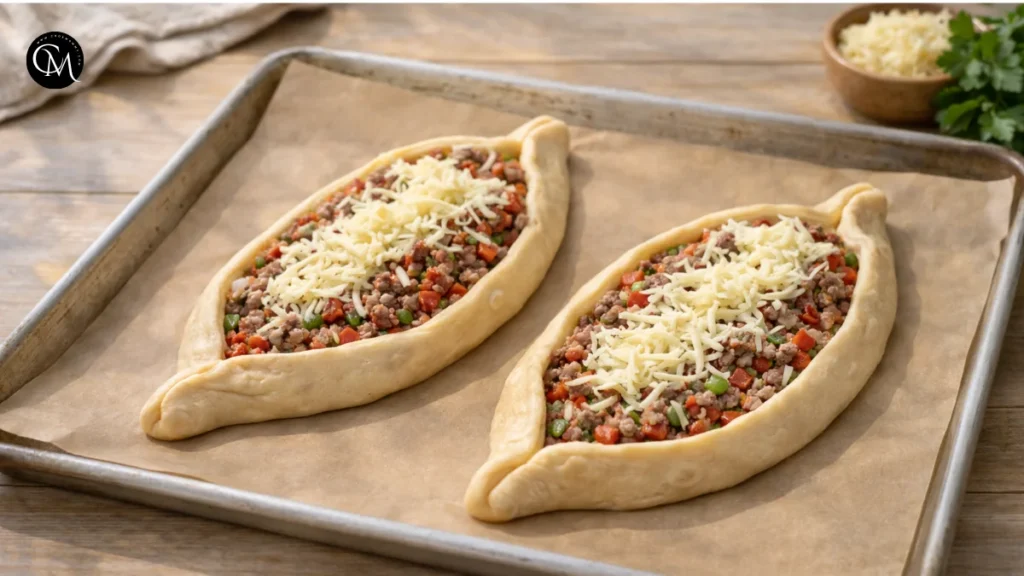
Step 4 – Combine everything
Divide dough into portions and roll each into an oval about 0.5 cm thick in the center, leaving the edges slightly thicker. Transfer to a lined baking tray.
Spread the meat mixture evenly, keeping a small border around the edges. Add cheese if using, then fold the sides inward and pinch the ends to create the signature boat shape.
Flavor balance insight:
A balanced ratio of dough to topping ensures structure and flavor harmony. Too much filling prevents proper baking, while too little leaves the pide dry. Even spreading allows each bite to deliver crust, seasoning, and texture together.
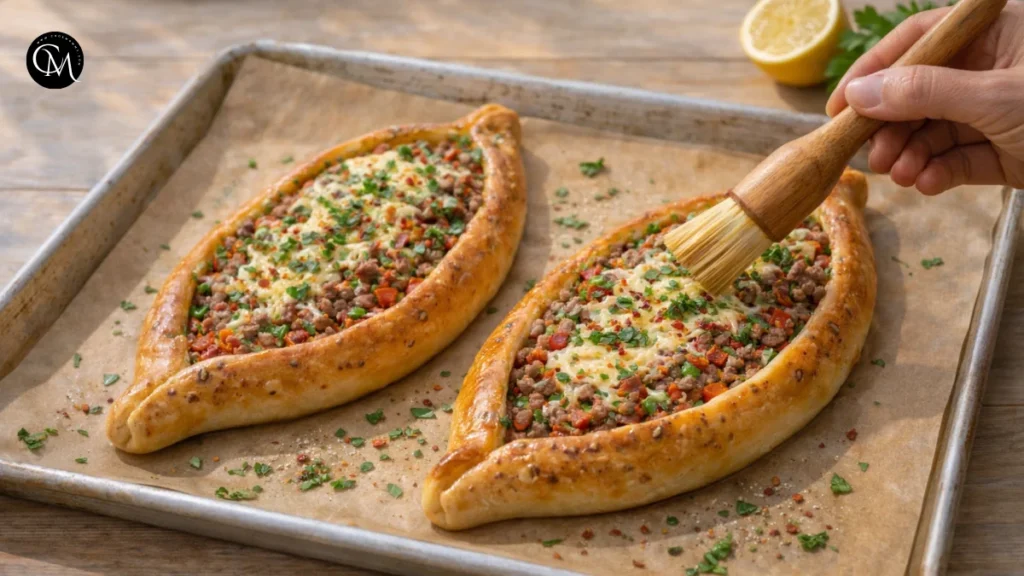
Step 5 – Finish & adjust seasoning
Bake in a preheated oven at 220°C (425°F) for 12–15 minutes until the edges turn golden and the underside becomes lightly crisp. Rotate the tray halfway through for even baking.
Remove from the oven and immediately garnish with chopped parsley, chili flakes, or a squeeze of lemon. Brush the crust lightly with olive oil or melted butter for added shine and softness.
Chef-style advice:
Final touches define the dish. Fresh herbs lift the aroma, citrus balances richness, and brushing the crust keeps it tender while enhancing flavor. Taste once out of the oven and adjust seasoning if needed small tweaks at this stage make the pide feel complete and restaurant-quality.d cuts through richness, creating a more complex and satisfying bite.
Nutritional Information
Approximate values per serving:
| Nutrient | Amount |
|---|---|
| Calories | 320–380 kcal |
| Protein | 16–20 g |
| Carbohydrates | 35–40 g |
| Fat | 12–16 g |
| Fiber | 2–4 g |
These numbers vary depending on toppings and dough thickness. The combination of protein, carbohydrates, and fats makes this dish filling without being excessively heavy when portioned properly.
Healthier Alternatives
Lower sugar & refined carbs
- Use whole wheat flour or oat flour blend
- Reduce cheese quantity slightly
Whole-grain options
- Mix 50% whole wheat flour for extra fiber
- Add seeds like sesame for texture
Dairy-free or gluten-free
- Use dairy-free mozzarella alternatives
- Gluten-free flour blend with xanthan gum
Adaptations
- For children: mild seasoning, extra cheese
- For dieters: lean chicken topping, thinner dough
- For seniors: softer dough with yogurt enrichment
These changes maintain flavor while improving nutritional balance.
Serving Suggestions for the pide pizza
- Serve with yogurt-garlic dip for creaminess
- Pair with fresh cucumber salad for contrast
- Add olives and pickled vegetables for Turkish-style presentation
- Cut into smaller pieces for gatherings and sharing
For a family dinner, present the pide on a wooden board with lemon wedges and herbs to create a warm, inviting table atmosphere.
Common Mistakes to Avoid for the pide pizza
- Overloading toppings: Causes soggy crust and uneven cooking.
- Under-kneading dough: Leads to dense, flat texture instead of airy bread.
- Low oven temperature: Prevents crust from browning and developing flavor.
- Skipping rest time: Reduces elasticity and makes shaping difficult.
- Uneven rolling: Causes one side to burn while the other remains soft.
Experienced bakers note that dough hydration and temperature control are the most common factors affecting outcome.
Storing Tips for the turkish pide pizza
- Store leftovers in an airtight container for up to 2 days in the refrigerator.
- Reheat in oven at medium heat to keep crust crisp.
- Dough can be prepared ahead and refrigerated overnight.
- Topping mixture can be made in advance and stored separately.
Proper storage maintains flavor while preventing dryness.
Chef Tips
Tool: Use a baking stone or heavy tray to replicate oven-baked texture.
Ingredient quality: Fresh vegetables and high-quality olive oil significantly enhance aroma.
Heat level: High initial heat helps crust puff and develop color quickly.
Timing: Remove pide when edges turn golden, not overly brown, to preserve softness.
These small details often separate average results from restaurant-quality outcomes.
Personal Experience
pide pizza became one of my regular meals because it balances convenience with authentic flavor. It’s quick enough for weeknight cooking yet impressive enough to serve guests, and every batch can be customized based on what’s available in the kitchen.
Conclusion
Making turkish pide pizza at home is easier than many people expect, and the results are incredibly rewarding. With a soft dough, balanced toppings, and high-heat baking, you can create a dish that feels both traditional and modern. The method encourages experimentation while keeping flavor at the center.
Try pide pizza, adjust it to your taste, and share it with friends or family. If you enjoyed it, leave a comment or review and subscribe for more practical cooking guides, global pide pizza, and flavor-focused tips designed for real home kitchens.
FAQs
1. Can I make the dough without yeast?
Yes, but texture will differ. Baking powder versions are faster yet less airy.
2. What cheese works best?
Mozzarella, kasar, or any meltable cheese with mild flavor.
3. Can I freeze turkish pide pizza?
Yes. Bake first, cool, then freeze and reheat in oven.
4. How thin should the dough be?
About 0.5 cm in the center, slightly thicker edges.
5. Can I make it vegetarian?
Absolutely spinach, mushrooms, and feta work well.
6. What oven setting is best?
Top and bottom heat at high temperature ensures crisp crust.
7. How do I keep the crust soft?
Avoid overbaking and brush edges lightly with olive oil after baking.
Tried it before ?
Nice recipe / Loved it
This recipe is easy and delicious.
