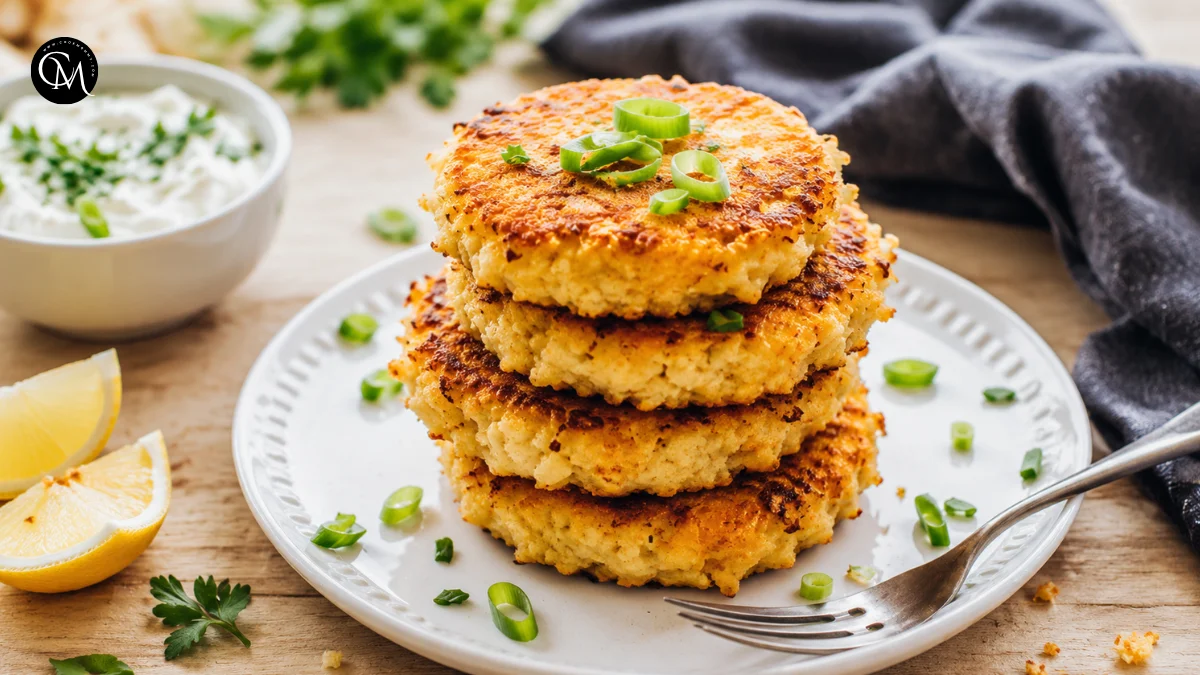
Cauliflower croquette: How 5 Steps Make It Golden
Did you know that cauliflower can lose more than half of its volume once cooked, yet still create one of the crispiest and most satisfying vegetable bites when handled the right way? That is exactly why Cauliflower croquette deserves a place in your recipe collection. It turns a simple vegetable into golden, crunchy, tender little patties that work as an appetizer, side dish, lunchbox snack, or light dinner.
What makes this recipe special is the balance of texture. You get a crisp outside, a soft and savory center, and a mild flavor that pairs beautifully with herbs, cheese, garlic, lemon, or your favorite dipping sauce. Unlike heavy fried snacks, Cauliflower croquette feels comforting without being too rich. It is also a smart way to make cauliflower more appealing for children, picky eaters, or anyone who wants more vegetable-based meals.
This recipe is worth reading because it focuses on practical kitchen details: how to remove extra moisture, how to build flavor, how to shape the mixture, and how to cook each piece until beautifully golden.
Table of Contents
Ingredients List
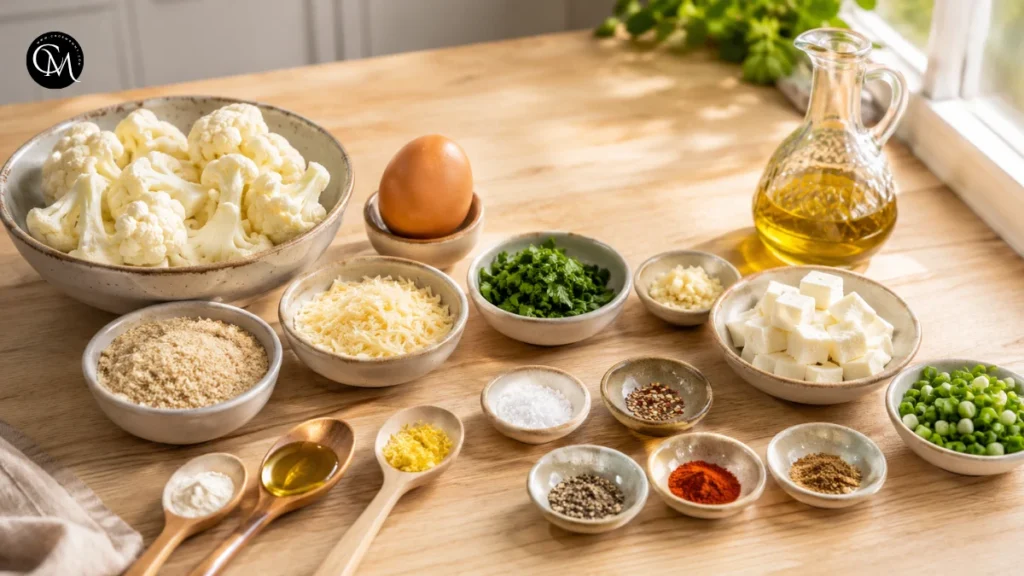
To make Cauliflower croquette, you need simple ingredients that are easy to find and flexible enough for substitutions.
Main ingredients:
- 1 medium cauliflower head, cut into florets
- 1 large egg
- ½ cup breadcrumbs
- ¼ cup grated parmesan cheese or cheddar
- 2 tablespoons chopped parsley
- 1 small garlic clove, minced
- ½ teaspoon salt
- ¼ teaspoon black pepper
- ¼ teaspoon paprika
- 1 tablespoon flour, if the mixture feels too soft
- 2 to 3 tablespoons olive oil or neutral oil for cooking
Optional flavor boosters:
- Lemon zest for freshness
- Chili flakes for light heat
- Green onion for a sharper flavor
- Mozzarella cubes for a cheesy center
- A pinch of cumin for a warm, earthy taste
Substitution ideas:
For gluten-free Cauliflower croquette, use gluten-free breadcrumbs or crushed rice crackers. For a dairy-free version, skip the cheese and add nutritional yeast or extra herbs. If you want a richer bite, use cheddar. If you prefer a lighter flavor, parmesan gives a salty, nutty finish without overpowering the cauliflower.
The best ingredients here are not complicated. The real secret is moisture control. Cauliflower holds water, and too much water makes croquettes soft instead of crisp. That is why each step matters.
Timing
- Preparation time: 20 minutes
- Cooking time: 15 minutes
- Total time: 35 minutes
- Yield: About 12 small croquettes
Many vegetable croquette recipes take 45 to 60 minutes because they require chilling or deep frying. This Cauliflower croquette recipe is faster because the mixture is simple, the shapes are small, and the croquettes cook quickly in a skillet or air fryer.
Step-by-Step Instructions
Step 1 – Prepare ingredients
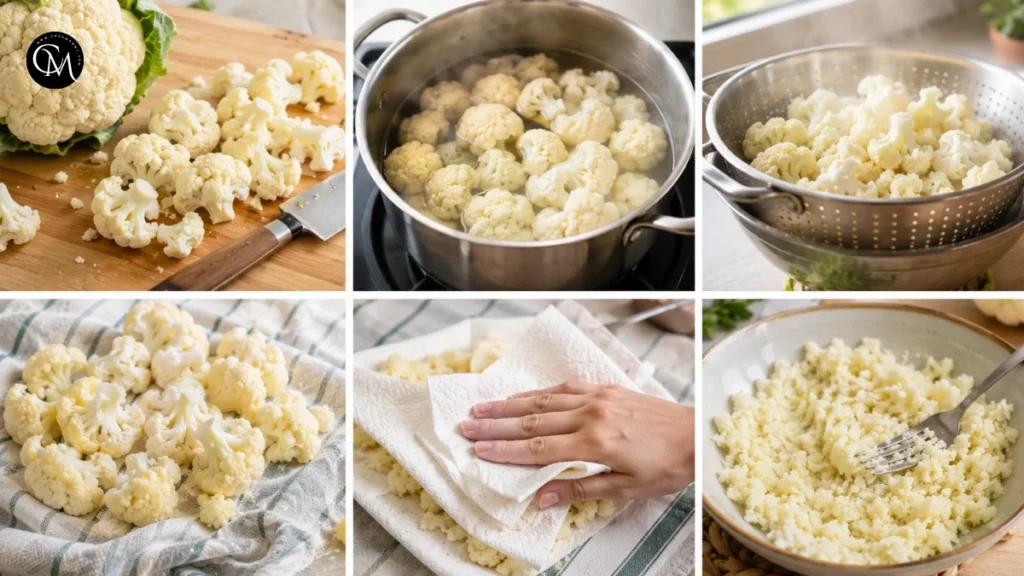
Start by cutting the cauliflower into even florets. Try to keep the pieces close in size so they cook evenly. Steam or boil them for 8 to 10 minutes, until tender enough to mash with a fork.
Drain the cauliflower very well. This is one of the most important parts of the recipe. After draining, let it sit in the colander for a few minutes so steam can escape. Then place it on a clean kitchen towel or paper towels and gently press out extra moisture.
Good preparation prevents a wet mixture. If the cauliflower is too watery, the croquettes may fall apart or taste mushy. A well-drained base gives Cauliflower croquette its firm shape and better golden crust.
Once dry, mash the cauliflower in a bowl. You do not need a perfectly smooth purée. A little texture is good because it gives the croquettes a more homemade bite.
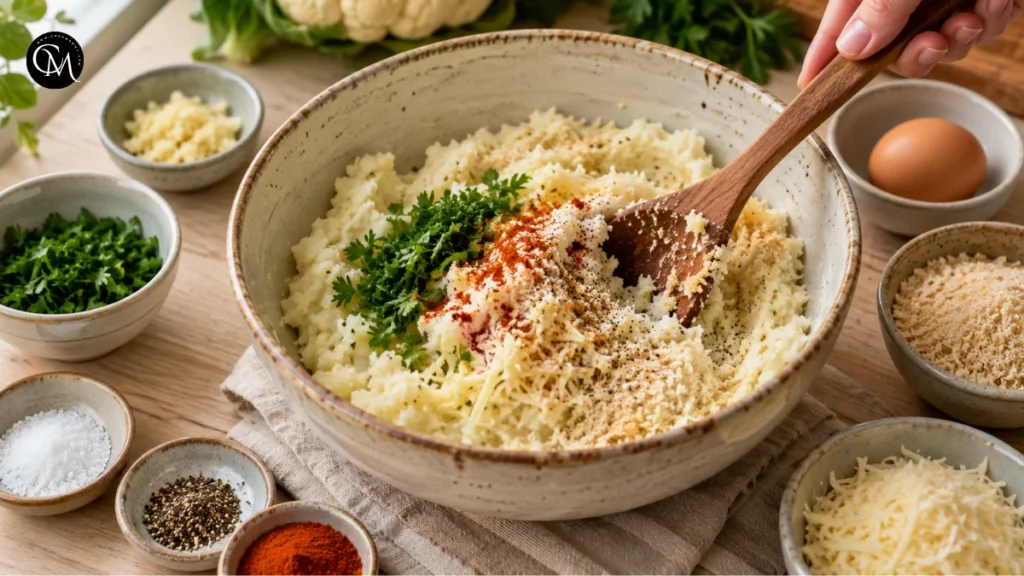
Step 2 – Build flavor base
Add minced garlic, parsley, salt, pepper, paprika, cheese, and breadcrumbs to the mashed cauliflower. Mix gently until everything starts to come together.
This step builds the flavor foundation. Cauliflower is mild, which makes it perfect for absorbing seasoning. Garlic adds depth, paprika adds warmth, herbs add freshness, and cheese gives a savory note. Breadcrumbs help bind the mixture and create structure.
The cooking science is simple: dry ingredients absorb extra moisture, while egg helps hold the mixture together when heated. Cheese also melts slightly, helping the inside feel tender and rich.
Taste the mixture before adding the egg if you want to check the seasoning. Since raw egg should not be tasted once added, this small step helps you adjust salt and spices safely.
Step 3 – Cook the main ingredient
Now add the egg and mix until the cauliflower mixture becomes thick enough to shape. If it still feels loose, add 1 tablespoon of flour or extra breadcrumbs. Let the mixture rest for 5 minutes. This gives the breadcrumbs time to absorb moisture.
Shape the mixture into small oval or round patties. Keep them compact, but do not squeeze too hard. Pressing too much can make the inside dense. A good Cauliflower croquette should feel firm enough to hold its shape but still light after cooking.
Heat oil in a skillet over medium heat. When the oil looks shiny, add the croquettes in a single layer. Do not overcrowd the pan. Cook for 3 to 4 minutes per side, until golden brown and crisp.
Texture tip: medium heat works better than high heat. If the pan is too hot, the outside browns before the inside firms up. If the heat is too low, the croquettes absorb too much oil and become heavy.
Step 4 – Combine everything
As the croquettes cook, the flavors settle into balance. The cauliflower becomes mild and creamy, the breadcrumbs create structure, and the cheese adds a savory finish. If you added herbs or lemon zest, they brighten the flavor and keep the recipe from tasting too rich.
After cooking each batch, place the croquettes on a plate lined with paper towels or a wire rack. A wire rack is even better because it keeps the bottoms from steaming. This small detail helps preserve the crispy texture.
For extra crunch, you can roll each shaped Cauliflower croquette in a little extra breadcrumb before cooking. This creates a more defined crust, especially if you plan to serve them as party appetizers.
Step 5 – Finish & adjust seasoning
Once all the croquettes are cooked, sprinkle them lightly with salt while they are still warm. Add a squeeze of lemon juice if you like a fresher taste. Serve immediately for the best texture.
Chef-style advice: always taste the first cooked croquette before finishing the batch. This lets you adjust the remaining mixture with more salt, pepper, herbs, or breadcrumbs if needed. Small changes at this stage can make the whole recipe better.
If you want a restaurant-style finish, serve Cauliflower croquette with a creamy yogurt dip, garlic sauce, spicy mayo, tahini lemon sauce, or simple tomato salsa.


Nutritional Information
Approximate values per 2 croquettes:
| Nutrient | Amount |
|---|---|
| Calories | 145 |
| Protein | 6 g |
| Carbohydrates | 15 g |
| Fat | 7 g |
| Fiber | 3 g |
| Sodium | 310 mg |
These values depend on the size of your croquettes, the cheese used, and how much oil is absorbed during cooking. Pan-frying gives the best golden crust, while baking or air frying can reduce added fat. Cauliflower croquette is a vegetable-forward recipe, but it still includes breadcrumbs, egg, and cheese, so portion size matters if you are tracking calories.
Healthier Alternatives
For a lighter Cauliflower croquette, bake the croquettes at 400°F, or 200°C, for about 18 to 22 minutes, flipping halfway through. They may be slightly less crisp than pan-fried ones, but they still turn golden and tasty.
For a lower-sugar option, there is usually nothing to change because this recipe does not rely on added sugar. Just avoid sweet dipping sauces if you want to keep the flavor more savory.
For whole-grain options, use whole-wheat breadcrumbs or crushed whole-grain crackers. They add a deeper flavor and a slightly nuttier texture.
For dairy-free Cauliflower croquette, skip the cheese and add nutritional yeast, extra garlic, and fresh herbs. For gluten-free needs, use certified gluten-free breadcrumbs. For children, make smaller bite-sized pieces and serve them with a mild yogurt dip. For seniors, shape them slightly flatter so they cook evenly and have a softer center.
Serving Suggestions
Cauliflower croquette is very flexible, which is why I like making it for both quick meals and family snacks. Serve it as an appetizer with dipping sauces, or turn it into a light plate with salad, roasted vegetables, or soup.
For lunchboxes, let the croquettes cool completely before packing. Add cucumber sticks, cherry tomatoes, cheese cubes, or a small container of dip. For dinner, serve them with grilled chicken, fish, rice, or a fresh lemony salad.
For a party platter, arrange Cauliflower croquette with different sauces: garlic yogurt, spicy ketchup, herb mayo, and tahini lemon. Add lemon wedges and fresh parsley to make the plate look bright and inviting.
My favorite way is simple: warm croquettes, a spoonful of Greek yogurt sauce, a little lemon zest, and a crunchy green salad on the side.
Common Mistakes to Avoid
- Not draining the cauliflower well
Too much water makes the mixture loose and prevents a crisp crust. Always press out extra moisture after steaming or boiling. - Adding too many breadcrumbs at once
Breadcrumbs help bind, but too much can make Cauliflower croquette dry. Add a little, wait, then adjust. - Cooking on very high heat
High heat burns the outside before the inside sets. Medium heat gives a better golden color and even texture. - Overcrowding the pan
Croquettes need space. If the pan is crowded, they steam instead of crisp. - Skipping the resting time
Letting the mixture rest for 5 minutes helps the breadcrumbs absorb moisture and makes shaping easier. - Flipping too early
Wait until the bottom is golden and firm. If you flip too soon, the croquettes may break.
Storing Tips for the Recipe
Store leftover Cauliflower croquette in an airtight container in the refrigerator for up to 3 days. Let them cool completely before storing, because trapped steam can soften the crust.
To reheat, use an oven, air fryer, or skillet. Avoid the microwave if you want crisp edges, because it makes the croquettes softer. Reheat at 350°F, or 175°C, for about 8 to 10 minutes.
You can also prepare the mixture ahead of time and refrigerate it for up to 24 hours before cooking. If it becomes wetter after resting, add a spoonful of breadcrumbs before shaping.
This recipe became one of my regular meals because it turns one simple cauliflower into something my family actually gets excited to eat. It is budget-friendly, easy to adapt, and useful for snacks, sides, and quick lunches.
Conclusion
Cauliflower croquette is the kind of recipe that proves simple ingredients can create big flavor when the method is right. With just a few pantry staples, you can make golden, crispy bites that are tender inside, full of savory flavor, and easy to serve in many ways. The key is draining the cauliflower well, seasoning the mixture properly, and cooking the croquettes at the right heat.
Try this recipe the next time you want a vegetable dish that feels comforting but still fresh. Serve it with your favorite dip, add it to a lunchbox, or make it for a family appetizer. After you try it, leave a comment or review, and subscribe for more easy homemade recipes and practical cooking tips.
FAQs
Can I bake Cauliflower croquette instead of frying it?
Yes. Bake at 400°F, or 200°C, for 18 to 22 minutes. Flip halfway through and brush lightly with oil for a better golden crust.
Why does my Cauliflower croquette fall apart?
The mixture may be too wet or under-bound. Drain the cauliflower well, add enough breadcrumbs, and let the mixture rest before shaping and cooking.
Can I make Cauliflower croquette ahead of time?
Yes. Prepare the mixture up to 24 hours ahead and keep it covered in the fridge. Shape and cook just before serving for best texture.
What sauce goes best with Cauliflower croquette?
Garlic yogurt sauce, spicy mayo, tahini lemon sauce, tomato salsa, or herb dip all work well. Choose a sauce that adds freshness or gentle heat.
Can I freeze Cauliflower croquette?
Yes. Freeze cooked croquettes on a tray, then transfer to a freezer bag. Reheat from frozen in an oven or air fryer until hot and crisp.
Is Cauliflower croquette good for kids?
Yes. The mild flavor and crispy texture make it kid-friendly. Shape smaller pieces and serve with a familiar dip like yogurt sauce or ketchup.
Can I make this recipe gluten-free?
Yes. Use gluten-free breadcrumbs or crushed gluten-free crackers. Check labels carefully, especially if cooking for someone with gluten sensitivity.
Tried it before ?
There are no reviews yet. Be the first one to write one.