
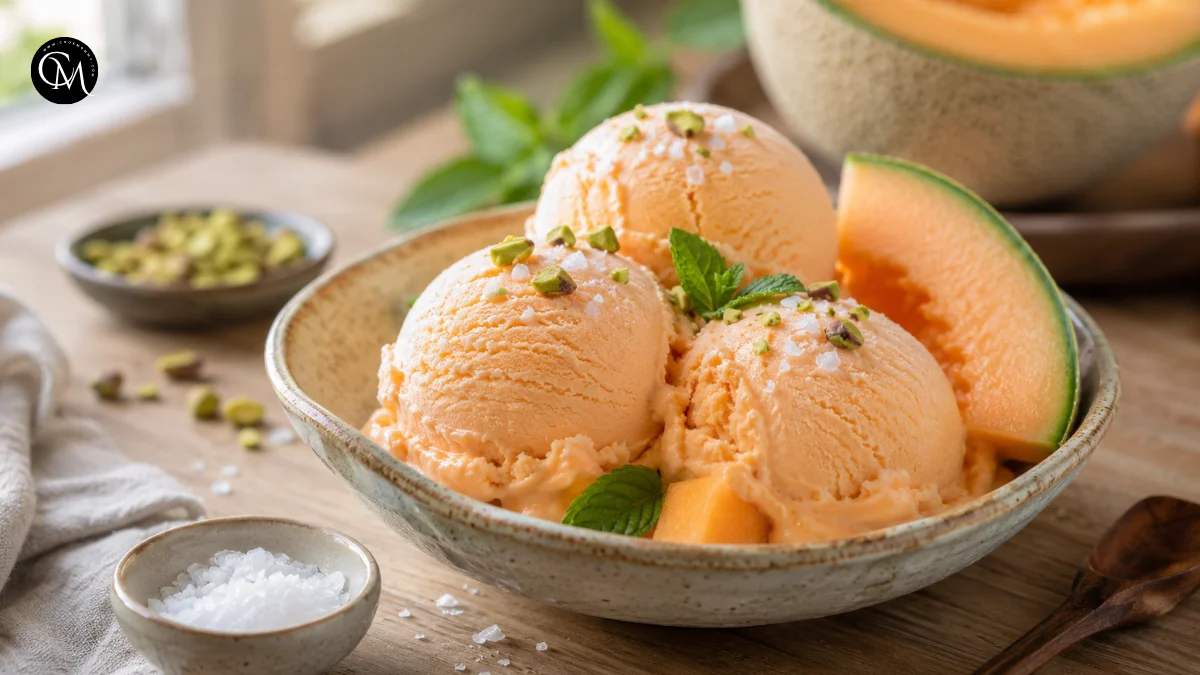
Cantaloupe Sea Salt Ice Cream: 5 Easy Homemade Tips
Did you know that fruit-based ice cream can turn icy even when it contains plenty of cream? Cantaloupe is naturally juicy, which makes it refreshing but also challenging to freeze into a smooth dessert. Too much water creates hard ice crystals, while too little fruit leaves the finished scoop tasting flat.
This Cantaloupe Sea Salt Ice Cream solves both problems by gently cooking the melon, concentrating its flavor, and balancing its sweetness with a small amount of sea salt. The result is creamy, fruity, and surprisingly sophisticated without requiring complicated ingredients.
The salt does not make the ice cream taste salty. Instead, it sharpens the ripe melon flavor and reduces the heavy sweetness sometimes found in homemade frozen desserts. This Sea Salt Ice Cream is especially useful when you have a very ripe cantaloupe that needs to be used quickly. With a few practical techniques, you can create a smooth, scoopable summer dessert that tastes fresher than most store-bought options.
Table of Contents
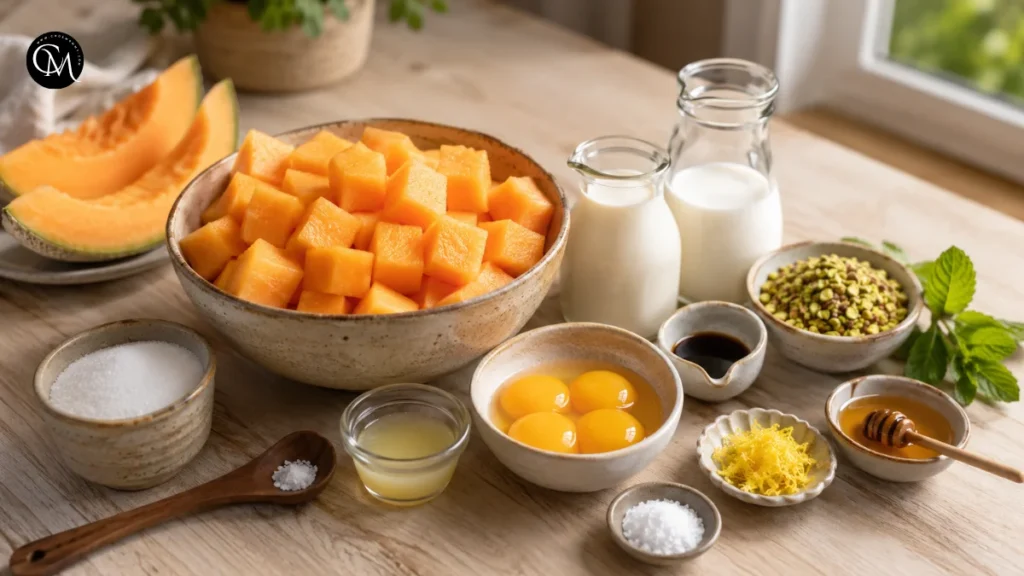
Ingredients List
Choose a fragrant cantaloupe that feels heavy for its size and smells sweet near the stem end. A ripe melon provides better flavor and requires less added sugar.
For the ice cream base
- 3 cups ripe cantaloupe, peeled, seeded, and cubed
- ¾ cup granulated sugar, divided
- 1 tablespoon fresh lemon juice
- 1 cup heavy cream
- 1 cup whole milk
- 4 large egg yolks
- 1 teaspoon pure vanilla extract
- ¼ teaspoon fine sea salt, plus more to taste
- 1 teaspoon finely grated lemon zest, optional
Optional additions
- 1 tablespoon honey for a softer texture
- A small pinch of flaky sea salt for serving
- Fresh mint leaves for garnish
- Toasted coconut flakes
- Chopped pistachios
- Thin slices of fresh cantaloupe
Ingredient substitutions
Heavy cream can be replaced with full-fat coconut cream for a dairy-free variation. Whole milk may be substituted with evaporated milk for a richer base or unsweetened oat milk for a lighter option.
Regular table salt can technically be used, but fine sea salt has a cleaner flavor and dissolves more evenly. Avoid heavily flavored salts, as they may overpower the delicate cantaloupe.
If your melon is exceptionally sweet, reduce the sugar by two or three tablespoons. Do not remove too much, because sugar affects both sweetness and texture in Sea Salt Ice Cream.
Timing
- Preparation time: 25 minutes
- Cooking time: 20 minutes
- Chilling time: 4 hours
- Churning time: 20–25 minutes
- Freezing time: 3–4 hours
- Total time: About 8 hours, including chilling and freezing
The active preparation takes less than one hour. Most of the total time is hands-off chilling and freezing. Compared with quick no-churn recipes, this custard-style method requires more patience, but it produces a creamier, more stable texture.
Step-by-Step Instructions
Step 1 – Prepare the ingredients
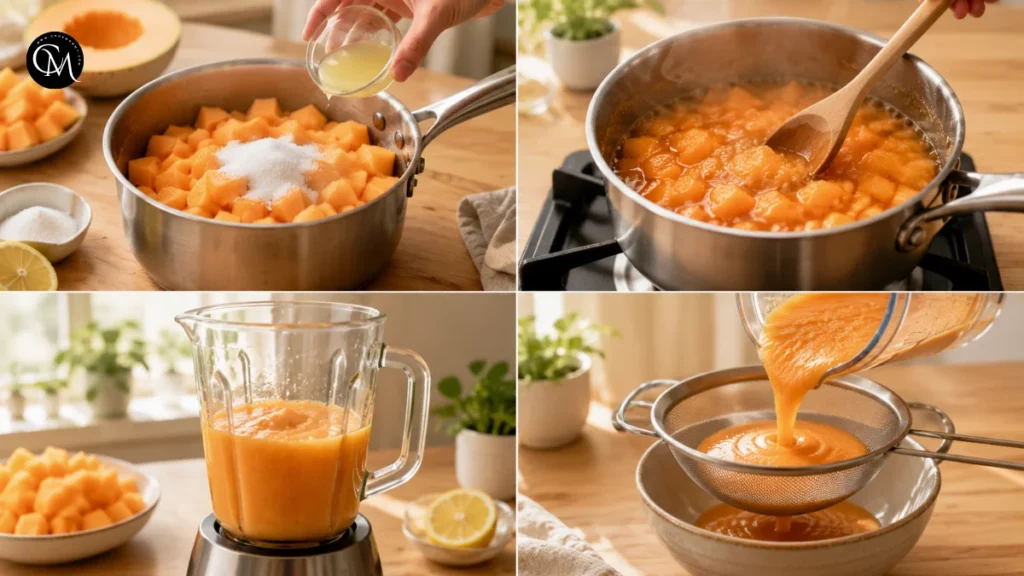
Cut the cantaloupe in half and remove the seeds with a spoon. Slice away the rind, then cut the flesh into small, even cubes. Measure three cups after trimming.
Taste the fruit before adding sugar. This simple step helps you judge its sweetness and adjust the recipe. An underripe melon may need the full amount of sugar, while a very sweet melon may need slightly less.
Separate the egg yolks and place them in a heatproof mixing bowl. Measure the cream, milk, salt, vanilla, and sugar before turning on the stove. Good preparation matters because custard can overcook quickly while you search for an ingredient.
Smaller cantaloupe cubes cook more evenly and release moisture faster. This helps concentrate the fruit flavor without leaving large watery pieces in the finished Sea Salt Ice Cream.
Step 2 – Build the flavor base
Place the cantaloupe cubes in a medium saucepan with ¼ cup of the sugar and the lemon juice. Cook over medium heat for 8–10 minutes, stirring occasionally.
As the melon warms, it releases juice. Continue cooking until the cubes soften and the liquid becomes slightly syrupy. This process removes some excess water and strengthens the natural melon flavor.
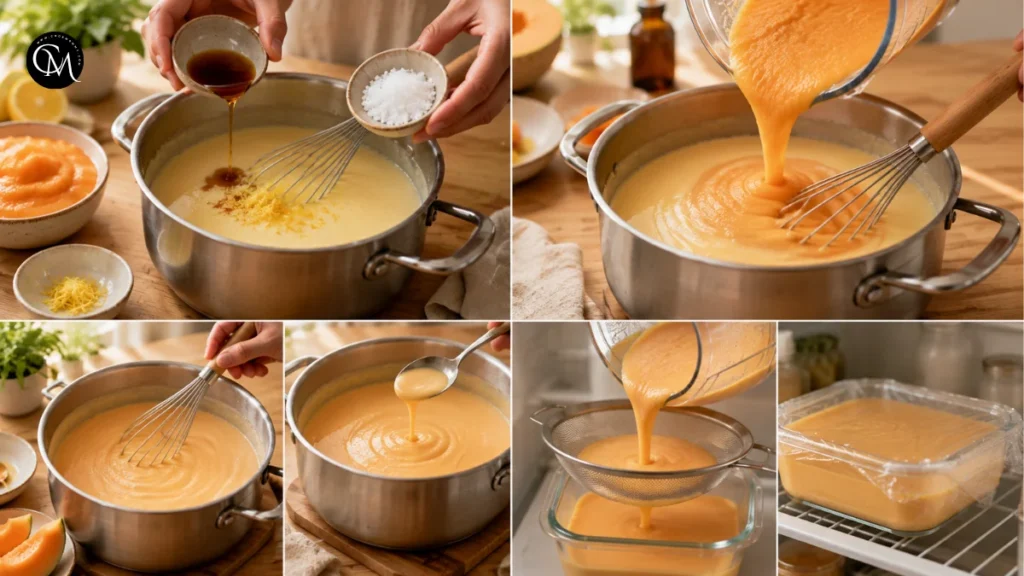
Transfer the cooked fruit to a blender and blend until completely smooth. For an extra-refined texture, pour the purée through a fine-mesh strainer. Straining is optional, but it removes any fibrous pieces and gives the base a silkier finish.
Let the purée cool while you prepare the custard. Cooking the fruit separately also prevents its natural acidity from interfering with the dairy mixture.
Step 3 – Cook the main ingredient
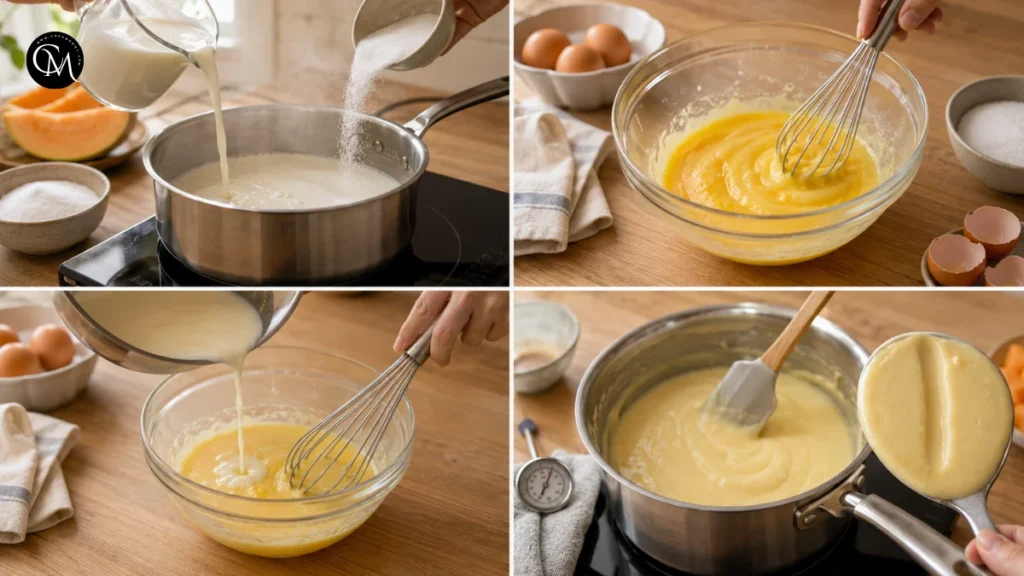
Pour the heavy cream and whole milk into a clean saucepan. Add half of the remaining sugar and heat over medium-low heat until steaming. Do not let the mixture boil.
Meanwhile, whisk the egg yolks with the remaining sugar until slightly pale and smooth. Slowly pour about half a cup of the warm dairy mixture into the yolks while whisking constantly. This is called tempering, and it gradually warms the eggs so they do not scramble.
Pour the tempered yolk mixture back into the saucepan. Cook over low heat, stirring continuously with a silicone spatula or wooden spoon.
The custard is ready when it lightly coats the back of the spoon. If you run a finger through the coating, the line should remain clear. For accuracy, the mixture should reach approximately 170–175°F, or 77–79°C.
Avoid boiling the custard. Excessive heat can make the egg proteins tighten too quickly, producing a grainy texture instead of a smooth Sea Salt Ice Cream base.
Step 4 – Combine everything
Remove the custard from the heat. Stir in the vanilla extract, fine sea salt, and optional lemon zest.
Add the cooled cantaloupe purée and whisk until the mixture is evenly blended. Taste a small spoonful once it has cooled slightly. The base should taste a little sweeter and more intense than you want the frozen dessert to taste because cold temperatures reduce our perception of sweetness and aroma.
The lemon juice brightens the melon without making the recipe taste lemony. The sea salt softens any overly sugary notes and makes the cantaloupe taste fuller.
Pour the mixture through a fine-mesh strainer into a clean container. Cover the surface and refrigerate for at least four hours, preferably overnight. A thoroughly chilled base freezes faster in the ice cream machine, creating smaller ice crystals and a creamier result.
Step 5 – Finish and adjust the seasoning
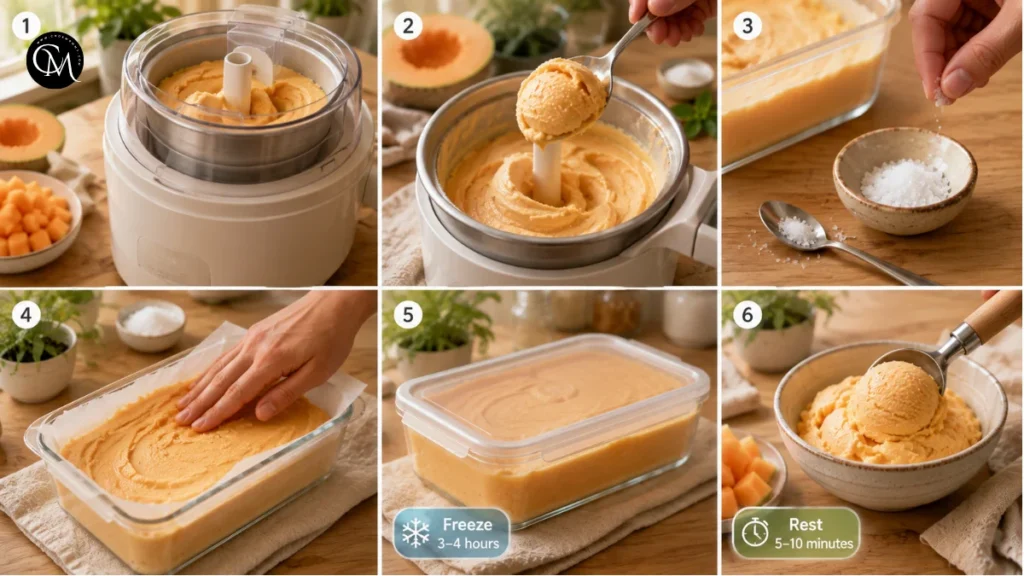
Churn the chilled mixture according to your ice cream maker’s instructions. Most machines require 20–25 minutes. The finished mixture should resemble thick soft-serve ice cream.
Taste a small spoonful before transferring it to the freezer. Add only a tiny pinch of extra sea salt if the flavor still seems flat. Salt should support the fruit, not dominate it.
Transfer the churned Sea Salt Ice Cream to a shallow freezer-safe container. Press parchment paper directly against the surface to reduce ice formation, then cover with a lid.
Freeze for three to four hours for a firm, scoopable texture. Before serving, leave the container at room temperature for 5–10 minutes. This short rest softens the ice cream enough to scoop without allowing it to melt.
Five Easy Homemade Tips
- Use fully ripe cantaloupe The melon should smell sweet and floral. An underripe cantaloupe often produces bland ice cream, even when extra sugar is added.
- Cook away excess moisture Fresh melon contains a large amount of water. Briefly cooking it concentrates the flavor and reduces the risk of hard, icy Sea Salt Ice Cream.
- Chill the base completely A warm base churns slowly and forms larger ice crystals. Refrigerating it overnight usually produces the smoothest texture.
- Add salt gradually Start with ¼ teaspoon. Different salt brands vary in strength, and an extra pinch can always be added after churning.
- Store it in a shallow container A shallow container helps the ice cream freeze evenly and makes it easier to scoop later.
Nutritional Information
Approximate nutrition per serving, based on eight servings:
- Calories: 265
- Protein: 4 grams
- Carbohydrates: 29 grams
- Total fat: 16 grams
- Saturated fat: 9 grams
- Sugar: 27 grams
- Fiber: 1 gram
- Sodium: 110 milligrams
These values are estimates and will vary depending on the sweetness of the cantaloupe, the dairy products used, and the serving size. This recipe is best enjoyed as a dessert rather than treated as a major source of fruit or protein.
Healthier Alternatives
- For a lower-sugar version, reduce the granulated sugar by two tablespoons and use a very ripe cantaloupe. Adding one tablespoon of honey can help maintain softness while providing extra sweetness. Avoid removing more than one-third of the sugar, or the ice cream may freeze too firmly.
- A dairy-free Sea Salt Ice Cream can be made with full-fat coconut cream and unsweetened oat milk. Coconut adds a noticeable flavor, so pair it with lime zest instead of lemon for a tropical variation.
- The recipe is naturally gluten-free because it contains no flour or grain ingredients. Whole-grain substitutions are therefore unnecessary. However, you can serve it with a homemade oat crumble, whole-grain shortbread, or toasted granola for added texture.
- For children, reduce the visible salt garnish and serve smaller scoops with fresh fruit. For older adults who prefer softer textures, allow the ice cream to soften for several minutes and serve it without crunchy toppings. Those watching their portions may enjoy a small scoop with a bowl of sliced berries or melon.
Serving Suggestions
- Serve Cantaloupe Sea Salt Ice Cream in chilled bowls so it melts more slowly. Add a few tiny flakes of sea salt immediately before serving for contrast, but use them sparingly.
- For a fresh summer dessert, pair one scoop with sliced strawberries, blueberries, or raspberries. Their mild acidity balances the creamy melon base.
- For a more elegant presentation, serve the ice cream in small glasses with toasted pistachios, mint, and a thin cantaloupe ribbon. You can create the ribbon with a vegetable peeler.
- The recipe also works well in homemade ice cream sandwiches. Place a small scoop between soft lemon cookies or thin oatmeal biscuits. Avoid very hard cookies, which can squeeze out the filling when bitten.
- For brunch, serve mini scoops beside fruit salad rather than offering a large dessert portion. You can also blend a scoop with milk and fresh cantaloupe to create a quick melon milkshake.
Common Mistakes to Avoid
- Using underripe fruit: Sugar cannot fully replace the fragrance of ripe cantaloupe. Choose a melon with a strong, sweet aroma.
- Skipping the cooking step: Raw melon introduces more water, which often leads to an icy texture.
- Boiling the custard: High heat may curdle the egg yolks. Keep the heat low and stir constantly.
- Churning a warm base: The colder the mixture, the faster it freezes and the smoother the result.
- Adding too much salt: Sea Salt Ice Cream should taste balanced, not savory. Measure carefully and adjust in tiny amounts.
- Freezing it uncovered: Air exposure encourages ice crystals and can absorb odors from other foods.
Storing Tips for the Sea Salt Ice Cream
- Store the finished ice cream in an airtight, freezer-safe container. A shallow metal or rigid plastic container works particularly well because it allows the mixture to freeze quickly.
- Press parchment paper or reusable freezer wrap directly against the surface before closing the lid. This limits air contact and helps prevent a layer of ice crystals.
- For the best flavor and texture, eat the ice cream within two weeks. It remains safe longer when properly frozen, but homemade ice cream gradually becomes harder because it does not contain the stabilizers commonly used in commercial products.
- The cantaloupe purée can be prepared one day ahead and refrigerated in a sealed container. The complete custard base can also chill overnight before churning.
- This recipe became one of my regular summer desserts because it transforms a simple ripe melon into something special without hiding its natural flavor. It is also an excellent way to use cantaloupe that is becoming too soft for fruit salad.
Conclusion
Cantaloupe Sea Salt Ice Cream combines ripe summer fruit, a creamy custard base, and just enough salt to make every flavor more noticeable. Cooking the melon, chilling the base thoroughly, and controlling the seasoning are the three most important techniques for achieving a smooth texture.
Sea Salt Ice Cream requires some chilling time, but the active work is straightforward and manageable for home cooks. It can also be adapted with coconut cream, reduced sugar, citrus zest, or crunchy toppings.
Try this Sea Salt Ice Cream the next time cantaloupes are sweet and fragrant. After making it, leave a comment or review sharing how you served it and whether you added any creative toppings. Subscribe for more practical homemade ice cream recipes, seasonal desserts, and tested kitchen tips.
FAQs
Can I make this recipe without an ice cream machine?
Yes. Freeze the chilled base in a shallow container and stir vigorously every 30 minutes for about three hours to break up ice crystals.
Why do I need to cook the cantaloupe?
Cooking removes some of the fruit’s excess water, concentrates its sweetness, and helps prevent the finished ice cream from becoming hard or icy.
How much sea salt should I add?
Start with ¼ teaspoon of fine sea salt. Taste after churning and add only a tiny extra pinch if the melon flavor needs more brightness.
Can I use frozen cantaloupe?
Yes, but thaw and drain it first. Frozen cantaloupe releases additional liquid, so cook the purée slightly longer to remove excess moisture.
How long does homemade Sea Salt Ice Cream last?
It tastes best within two weeks. Keep it tightly covered with parchment pressed against the surface to reduce ice crystals and freezer odors.
Can I make the base ahead of time?
Yes. Prepare and refrigerate the custard base up to 24 hours before churning. Overnight chilling can improve both flavor and texture.
What toppings pair well with cantaloupe ice cream?
Try toasted pistachios, mint, coconut flakes, fresh berries, lemon cookies, or a very light sprinkle of flaky sea salt.
Tried it before ?
There are no reviews yet. Be the first one to write one.